Post by HiveLord on Jul 7, 2005 16:11:19 GMT
Intro
Well.
Ever since I gathered the rumours and information from around the net, about the huge number of weapons and biomorphs that the brand new carnifex would be able to receive, I wondered what I would give it when I got one. I thought long and hard about what my army needed, but could not decide. When my Battleforce finally arrived, I could not bear to stick my fex together, for fear of making it really useless. The threads I have seen on magnetising models inspired me to buy a load of magnets to test out, and see whether I could incorporate them into the model to make it a bit more mutable.
I googled neodymium (rare earth) magnets, and found an English company that I could order magnets online from (www.powermagnetstore.com). I bought 30 small disc magnets- the size was “D6 x 2mm Disc - Grade N38”- 6mm diameter, 2mm thick. I guessed at the size- I just picked one that looked about right in the picture. These cost only 15 pence each, and the postage was only £1.75. Lo and behold, when they arrived, I found that they fit perfectly into the ‘fex arm sockets!
So, I spent a great deal of time and effort conceptualising, gluing, cutting, scraping, sculpting, constructing, screwing around with the magnets (man those magnets are fun to play with), and prising apart (with a knife and a screwdriver) magnets that accidentally got superglued together.
And then, when my effort was complete (Ok, to be honest it isn’t quite finished yet- I still have 4 heads and a back to do, a bit more sculpting, and of course, loads of paint), I decided that I would let the world know how they could turn their monsters of destruction into….umm…magnetic…monsters…*trails off*……
aaaaanyway…
I wrote this walkthrough to help steer you in the right path.
Enjoy my friends- and remember to take frequent breaks to absorb some biomass.
This guide will tell you how to build a magnetic carnifex. If you wish to build a magnetic Hive Tyrant, the processes will be similar, yet made slightly harder by the fact that it is a metal model- a bit more work involved. Ask if you need help doing this.
Step 1- In The Beginning
OK, first things first. You need to decide whether you want to need to magnetise your model. There are lots of factors you need to consider. I have made a list of pros and cons on adding magnets
Pros:
· Weapon combination can be changed
· Biomorphs can be changed
· Poses of arms and head can be changed
· Cheaper than buying multiple models
Cons:· You have to buy the magnets
· You have to spend time adding the magnets
· The poses are more limited than they are without magnets- less dynamic poses
And now you have decided that you want to add magnets to all your models ( ), you need to buy some.
Step 2- Resources
Ok, for this project, you will need:
· A carnifex boxed set, or the carnifex from the battleforce, unassembled
· Magnets
· Sculpting putty + tool
· Craft knife
· Superglue
· Model file/files
Magnets
Neodymium magnets, also known as rare earth magnets, are the strongest magnets known to man (apparently). You will want to use these for your project, or you will have a leper carnifex (limbs falling off randomly)
The size you will want is 6mm diameter and 2mm thick, because these fit into the arm sockets, and so therefore fit nicely onto the arms, and also can fit in the head socket and on the back. If you plan on doing extra detail, such as removable toxin sacs, adrenal gland, tail weapons, and extended carapace, you will need to get smaller magnets- possibly diameter 2mm, 1mm thick, but don’t quote me on that.
I used 28 magnets in total- 4 for the arm sockets, 14 for the arms, 1 for the head socket, 5 for the different head variants, 1 for the back join, 3 for the backs. You may want to use more or less, depending on how mutable you want it to be. For example, if you will only want one type of back, don’t bother with the magnets for it.
WARNING- Magnets can be dangerous. Be careful when handling them, so as to not damage skin. Keep them away from electrical equipment.
Sculpting Putty and tool
I used GW GS and the GW sculpting tool, but feel free to use any brand of putty and any miscellaneous objects for a tool.
Craft knife
Well…it needs to be….reasonably sharp…. You could get an X-Acto knife- nice and sharp, but quite brittle, or just a really cheap craft knife set- not so sharp, and still pretty snapable. Either will suffice.
Superglue
It needs to be able to glue stuff, so don’t get the cheapy tubes that are 5 for a pound- go for a small bottle, GW or otherwise.
Model files
These are not completely necessary, but you may want them to neaten up your model.
Step 3- Initial assembly
Ok.
Once you have all of the resources required, you can start.
Of course, you are probably too bust playing with the magnets by this stage to care about your carnifex any more- in fact, you have probably sold all of your warhammer and just invested everything into magnets. But if, on the off chance, you haven’t, then continue.
Remove the legs, lower torso/tail, and the strange hemispherical object from the sprues. Remove flash- If you don’t, then it will probably ruin a fantastic model. It may take some time, but it makes it look so much better. Stick together- make sure the feet are level with each other. Cut off the little knobbly bit on the ball joint if you want more choice when deciding your pose.
Remove the upper torso sides and back from the sprues. Remove flash. Stick together.
Ok, it is probably best to leave these parts separate from each other and the base, for ease of later steps, and painting.
You may want to use putty and a file to neaten up the gaps.
Now, you can start sticking on the magnets. Glue one in each of the four arm sockets. Make sure that on each side, both magnets have the same polarity on the side that is exposed. This is vital, so you can place arms in either socket on one side. It doesn’t matter that the ones on different sides of the torso are the same way around or not- but I find that if you put them different ways around, the pull of the magnets on the other side helps somewhat to hold the magnet in place whilst gluing. Lovely.
Gluing Magnets
Please, for Gods sake (no, not you GOD, the other one) make sure that all magnets are sufficiently attached to the model before gluing another one on near it. Believe me, trying to separate a couple of these magnets when they have superglue between them is no easy feat. Likewise, keep pressure applied to each magnet when you glue it until it is properly attached, or it will just flip off.
After gluing the magnets, use putty to fill the small gap around them
Step 4- Arms
Ok, now you have the four arm joints on the torso, you need some arms to go on it. Take the arms off of the sprues, and cut off the flash.
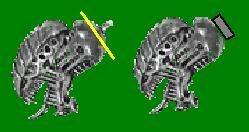
Pick an arm. Check which side of the body it goes on. Place a single magnet on one of the magnets on that side of the body.
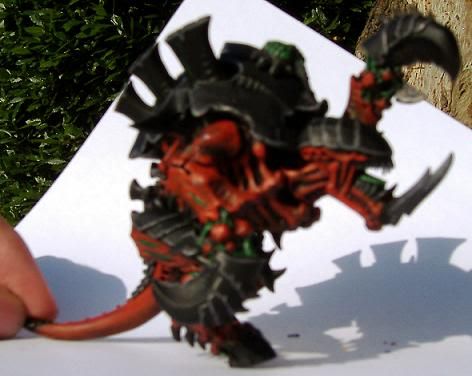
Now, choose a pose you want to put the arm in. Line it up, in that pose, with the magnet, as shown in this picture:

Now, cut the ball joint of the arm across this place (the yellow line on the picture). It is often quite hard to get it exactly right- you may want to draw a line on the arm (or get someone else to do it if you have run out of hands) .Take the one magnet off the torso, and stick onto the arm where you made the cut. Try and keep it in line with the edges of the arm, to ease later steps.
Repeat with all the arms.
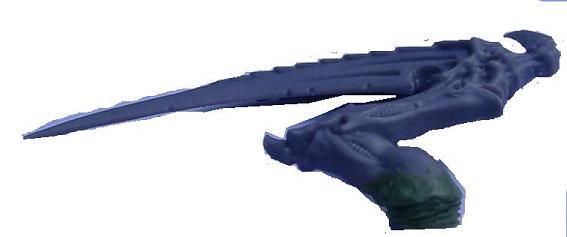
Two Arm Weapons
These produce a bit of a problem, but can be tackled by most reasonable modellers. Use the same method as with one arm, except do it with both sides of the torso at the same time, making sure that both arms are in the correct position and are connected together at the right point in the middle as well. You may want to glue the two arms together first, and then use this pose for drawing lines and cutting the joints of the arms. Don’t worry if they don’t fit perfectly, this can be altered in the next step.
Make sure the bond between the arms is strong- you may want to use Putty reinforced with superglue for a really strong bond, or even pin it.
You have one venom cannon and one Barbed Strangler. You should make one to fit the front set of magnets, and one to fit the back, so both can be taken at the same time. If you get another pair of each, make them to fit the other set than the first was made to fit, so you can take 2 venom cannons, or two Barbed Stranglers. If you get my drift…
Step 5- Arm joint sculpting
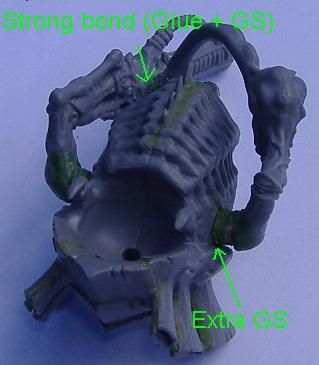
Well, as I am sure you will have noticed by now, when you put the arms onto the model, you can see the magnets. And they will not look good on the finished model. So. You need to cover them up. Which is what the putty and sculpting tool are for. The joint needs to be made to look like a tyranid’s. It is quite hard to sculpt properly, because the sculpting tool is attracted to the magnet…..a good reason for using something else to sculpt instead. Here is how I did it, feel free to copy me or design your own joint:
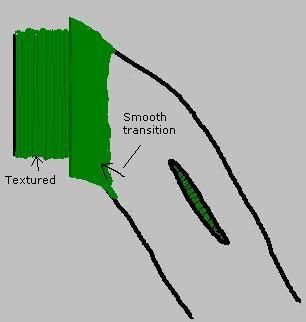
This was pretty easy to do- just roll some GS into a thin roll, wrap it around the magnet and the end of the arm. Then sculpt away. I smoothed out the putty on the arm to make it look like it is part of the arm. The textured part was quite easy- just a thin covering of putty, and run your tool through it repeatedly in long lines. It doesn’t look perfect, but it does look pretty cool, if I do say so myself.
If you want to change the pose of the arm a bit, or your two-arm weapons don’t fit on perfectly, then just add some putty onto the end of the magnet, and slope it how you desire. Make sure that it is textured round the sides.
WARNING- This is not so much a warning from something dangerous as a warning to prevent repeated loss of sanity. After spending ages sculpting a joint, the last thing you want is it to be squashed by a large mass of magnets or metal objects. Once it is sculpted, for your own sake, keep it away from the rest of your magnets, and anything else that could be attracted to the magnet, until the putty is set.
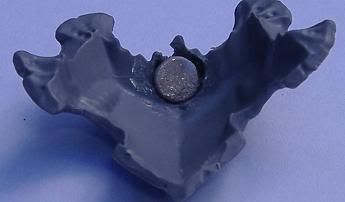
Step 6- The Back
Ok, this stage is quite tricky. The back piece needs to lie flat on the torso, so a hole has to be made in both the torso and the back plates that is big enough to fit one of your magnets in completely. I used a knife, which took quite a long time to do, but you could use a drill or a dremel (carefully). If you use a knife, it is pretty hard, and the knife will probably go through the back plate in a couple of places, but this can be covered up with putty.
See this picture, taken from WD307 (UK), for where to put the magnets.
(Picture coming soon)
Make sure the one on the torso is a far up as it can go, or the back will be pulled forwards slightly. It if is pulled forwards, this could be fixed with a bit of putty in the right place, but you will have to figure out where to put that yourself.
You need to choose whether you will be using thornback or no back upgrades, because both use the blank back plate. Unless, of course, you use tiny magnets to hold on the spikes….
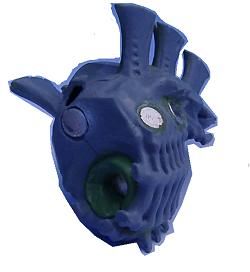
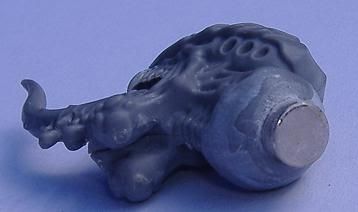
Step 7- The Head
Well, I have not, as yet, completed this step, so I will just tell you what I think should be done.
Cut off all the heads from the sprues and cut off the flash. You need to decide whether you will be using the plain head or the regeneration head, because both use one of the sides the same. I strongly recommend using the plain head. You could always say that it had regeneration anyway, as long as your opponents aren’t too strict. If you want to, you could use 3 magnets inside each of these three head sides, so you could change them around at will. Make sure you get the magnets the right way around.
Assemble all the heads, and if you want to, clean up the gaps with putty and a file.
Cut off the tip of the ball joint, including the knobbly bit, and glue a magnet onto this place, like so:
Make sure all of the magnets on the heads are on the same way around.
Cut/Drill/Dremel a hole in the head socket on the torso around the small hole where the knobbly bit went in, and when this is large enough to fit in a magnet, glue a magnet in- make sure it is in the right way around to be attracted to the ones on the heads.
Now, you have to cover up the magnets somehow. I haven’t done this yet, but I will soon, so watch this space. Make sure it looks niddy.
Here is a picture showing which way round all the magnets should go, and where they should go.
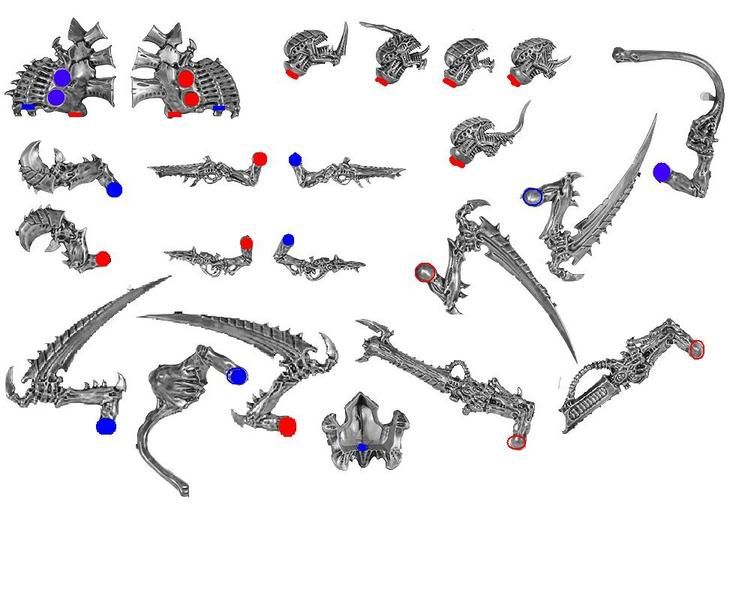
The picture is not to scale, and I am not 100% sure of its accuracy, so if you are unsure, just ask- although it is normally pretty obvious which way round you need to put the magnets.. The two colours are to show opposite polarities on the edge of the magnet which is going to be connected. Remember, red joins to blue. A hollow circle means that the magnet is on the other side (stupid sprue pictures). Note- the two on the torso for the head and the back are ‘shared’ on the picture by both sides of the torso, but in reality, there is one magnet for the head, and one for the back.
Step 8- The End?
Ok, now is the time to add any optional extras, such as toxin sacs, the spikes on the back, the tail weapons, the extended carapace, and/or the adrenal gland. Do it with magnets for full convertability- you will need tiny ones though. If not:
· Stick the toxin sacs on the arms which you will always use them on- perhaps on one pair of the scything talons? Or, if you don’t think you will use them, don’t put them on any. You can always stick them on afterwards
· If you are always going to use extended carapace, model the small plates onto the torso somehow, or even the legs- be creative
· If you want to put on tail weapons, do it, if not, then don’t…
· Adrenal glands are pretty cool, so you might as well stick one on to the plain torso, or if you want, stick smaller ones onto the other backs, or arms, or whatever. Do you what you feel like.
And then..
Paint it up, and stick the torso to the legs, and the legs to the base. Make sure it is in a good position, and one which gives room for the arms- especially the two arms weapons which aren’t as poseable as the others.
And enjoy your new magnetofex!
I will post up pictures of mine soon- hopefully by the end of the week.
Have Fun,
And remember kids,
Don’t talk to Tyranids,
Hive Lord
Well.
Ever since I gathered the rumours and information from around the net, about the huge number of weapons and biomorphs that the brand new carnifex would be able to receive, I wondered what I would give it when I got one. I thought long and hard about what my army needed, but could not decide. When my Battleforce finally arrived, I could not bear to stick my fex together, for fear of making it really useless. The threads I have seen on magnetising models inspired me to buy a load of magnets to test out, and see whether I could incorporate them into the model to make it a bit more mutable.
I googled neodymium (rare earth) magnets, and found an English company that I could order magnets online from (www.powermagnetstore.com). I bought 30 small disc magnets- the size was “D6 x 2mm Disc - Grade N38”- 6mm diameter, 2mm thick. I guessed at the size- I just picked one that looked about right in the picture. These cost only 15 pence each, and the postage was only £1.75. Lo and behold, when they arrived, I found that they fit perfectly into the ‘fex arm sockets!
So, I spent a great deal of time and effort conceptualising, gluing, cutting, scraping, sculpting, constructing, screwing around with the magnets (man those magnets are fun to play with), and prising apart (with a knife and a screwdriver) magnets that accidentally got superglued together.
And then, when my effort was complete (Ok, to be honest it isn’t quite finished yet- I still have 4 heads and a back to do, a bit more sculpting, and of course, loads of paint), I decided that I would let the world know how they could turn their monsters of destruction into….umm…magnetic…monsters…*trails off*……
aaaaanyway…
I wrote this walkthrough to help steer you in the right path.
Enjoy my friends- and remember to take frequent breaks to absorb some biomass.
This guide will tell you how to build a magnetic carnifex. If you wish to build a magnetic Hive Tyrant, the processes will be similar, yet made slightly harder by the fact that it is a metal model- a bit more work involved. Ask if you need help doing this.
Step 1- In The Beginning
OK, first things first. You need to decide whether you want to need to magnetise your model. There are lots of factors you need to consider. I have made a list of pros and cons on adding magnets
Pros:
· Weapon combination can be changed
· Biomorphs can be changed
· Poses of arms and head can be changed
· Cheaper than buying multiple models
Cons:· You have to buy the magnets
· You have to spend time adding the magnets
· The poses are more limited than they are without magnets- less dynamic poses
And now you have decided that you want to add magnets to all your models (
 ), you need to buy some.
Step 2- Resources
Ok, for this project, you will need:
· A carnifex boxed set, or the carnifex from the battleforce, unassembled
· Magnets
· Sculpting putty + tool
· Craft knife
· Superglue
· Model file/files
Magnets
Neodymium magnets, also known as rare earth magnets, are the strongest magnets known to man (apparently). You will want to use these for your project, or you will have a leper carnifex (limbs falling off randomly)
The size you will want is 6mm diameter and 2mm thick, because these fit into the arm sockets, and so therefore fit nicely onto the arms, and also can fit in the head socket and on the back. If you plan on doing extra detail, such as removable toxin sacs, adrenal gland, tail weapons, and extended carapace, you will need to get smaller magnets- possibly diameter 2mm, 1mm thick, but don’t quote me on that.
I used 28 magnets in total- 4 for the arm sockets, 14 for the arms, 1 for the head socket, 5 for the different head variants, 1 for the back join, 3 for the backs. You may want to use more or less, depending on how mutable you want it to be. For example, if you will only want one type of back, don’t bother with the magnets for it.
WARNING- Magnets can be dangerous. Be careful when handling them, so as to not damage skin. Keep them away from electrical equipment.
Sculpting Putty and tool
I used GW GS and the GW sculpting tool, but feel free to use any brand of putty and any miscellaneous objects for a tool.
Craft knife
Well…it needs to be….reasonably sharp…. You could get an X-Acto knife- nice and sharp, but quite brittle, or just a really cheap craft knife set- not so sharp, and still pretty snapable. Either will suffice.
Superglue
It needs to be able to glue stuff, so don’t get the cheapy tubes that are 5 for a pound- go for a small bottle, GW or otherwise.
Model files
These are not completely necessary, but you may want them to neaten up your model.
Step 3- Initial assembly
Ok.
Once you have all of the resources required, you can start.
Of course, you are probably too bust playing with the magnets by this stage to care about your carnifex any more- in fact, you have probably sold all of your warhammer and just invested everything into magnets. But if, on the off chance, you haven’t, then continue.
Remove the legs, lower torso/tail, and the strange hemispherical object from the sprues. Remove flash- If you don’t, then it will probably ruin a fantastic model. It may take some time, but it makes it look so much better. Stick together- make sure the feet are level with each other. Cut off the little knobbly bit on the ball joint if you want more choice when deciding your pose.
Remove the upper torso sides and back from the sprues. Remove flash. Stick together.
Ok, it is probably best to leave these parts separate from each other and the base, for ease of later steps, and painting.
You may want to use putty and a file to neaten up the gaps.
Now, you can start sticking on the magnets. Glue one in each of the four arm sockets. Make sure that on each side, both magnets have the same polarity on the side that is exposed. This is vital, so you can place arms in either socket on one side. It doesn’t matter that the ones on different sides of the torso are the same way around or not- but I find that if you put them different ways around, the pull of the magnets on the other side helps somewhat to hold the magnet in place whilst gluing. Lovely.
Gluing Magnets
Please, for Gods sake (no, not you GOD, the other one) make sure that all magnets are sufficiently attached to the model before gluing another one on near it. Believe me, trying to separate a couple of these magnets when they have superglue between them is no easy feat. Likewise, keep pressure applied to each magnet when you glue it until it is properly attached, or it will just flip off.
After gluing the magnets, use putty to fill the small gap around them
Step 4- Arms
Ok, now you have the four arm joints on the torso, you need some arms to go on it. Take the arms off of the sprues, and cut off the flash.
Pick an arm. Check which side of the body it goes on. Place a single magnet on one of the magnets on that side of the body.
Now, choose a pose you want to put the arm in. Line it up, in that pose, with the magnet, as shown in this picture:
Now, cut the ball joint of the arm across this place (the yellow line on the picture). It is often quite hard to get it exactly right- you may want to draw a line on the arm (or get someone else to do it if you have run out of hands) .Take the one magnet off the torso, and stick onto the arm where you made the cut. Try and keep it in line with the edges of the arm, to ease later steps.
Repeat with all the arms.
Two Arm Weapons
These produce a bit of a problem, but can be tackled by most reasonable modellers. Use the same method as with one arm, except do it with both sides of the torso at the same time, making sure that both arms are in the correct position and are connected together at the right point in the middle as well. You may want to glue the two arms together first, and then use this pose for drawing lines and cutting the joints of the arms. Don’t worry if they don’t fit perfectly, this can be altered in the next step.
Make sure the bond between the arms is strong- you may want to use Putty reinforced with superglue for a really strong bond, or even pin it.
You have one venom cannon and one Barbed Strangler. You should make one to fit the front set of magnets, and one to fit the back, so both can be taken at the same time. If you get another pair of each, make them to fit the other set than the first was made to fit, so you can take 2 venom cannons, or two Barbed Stranglers. If you get my drift…
Step 5- Arm joint sculpting
Well, as I am sure you will have noticed by now, when you put the arms onto the model, you can see the magnets. And they will not look good on the finished model. So. You need to cover them up. Which is what the putty and sculpting tool are for. The joint needs to be made to look like a tyranid’s. It is quite hard to sculpt properly, because the sculpting tool is attracted to the magnet…..a good reason for using something else to sculpt instead. Here is how I did it, feel free to copy me or design your own joint:
This was pretty easy to do- just roll some GS into a thin roll, wrap it around the magnet and the end of the arm. Then sculpt away. I smoothed out the putty on the arm to make it look like it is part of the arm. The textured part was quite easy- just a thin covering of putty, and run your tool through it repeatedly in long lines. It doesn’t look perfect, but it does look pretty cool, if I do say so myself.
If you want to change the pose of the arm a bit, or your two-arm weapons don’t fit on perfectly, then just add some putty onto the end of the magnet, and slope it how you desire. Make sure that it is textured round the sides.
WARNING- This is not so much a warning from something dangerous as a warning to prevent repeated loss of sanity. After spending ages sculpting a joint, the last thing you want is it to be squashed by a large mass of magnets or metal objects. Once it is sculpted, for your own sake, keep it away from the rest of your magnets, and anything else that could be attracted to the magnet, until the putty is set.
Step 6- The Back
Ok, this stage is quite tricky. The back piece needs to lie flat on the torso, so a hole has to be made in both the torso and the back plates that is big enough to fit one of your magnets in completely. I used a knife, which took quite a long time to do, but you could use a drill or a dremel (carefully). If you use a knife, it is pretty hard, and the knife will probably go through the back plate in a couple of places, but this can be covered up with putty.
See this picture, taken from WD307 (UK), for where to put the magnets.
(Picture coming soon)
Make sure the one on the torso is a far up as it can go, or the back will be pulled forwards slightly. It if is pulled forwards, this could be fixed with a bit of putty in the right place, but you will have to figure out where to put that yourself.
You need to choose whether you will be using thornback or no back upgrades, because both use the blank back plate. Unless, of course, you use tiny magnets to hold on the spikes….
Step 7- The Head
Well, I have not, as yet, completed this step, so I will just tell you what I think should be done.
Cut off all the heads from the sprues and cut off the flash. You need to decide whether you will be using the plain head or the regeneration head, because both use one of the sides the same. I strongly recommend using the plain head. You could always say that it had regeneration anyway, as long as your opponents aren’t too strict. If you want to, you could use 3 magnets inside each of these three head sides, so you could change them around at will. Make sure you get the magnets the right way around.
Assemble all the heads, and if you want to, clean up the gaps with putty and a file.
Cut off the tip of the ball joint, including the knobbly bit, and glue a magnet onto this place, like so:
Make sure all of the magnets on the heads are on the same way around.
Cut/Drill/Dremel a hole in the head socket on the torso around the small hole where the knobbly bit went in, and when this is large enough to fit in a magnet, glue a magnet in- make sure it is in the right way around to be attracted to the ones on the heads.
Now, you have to cover up the magnets somehow. I haven’t done this yet, but I will soon, so watch this space. Make sure it looks niddy.
Here is a picture showing which way round all the magnets should go, and where they should go.
The picture is not to scale, and I am not 100% sure of its accuracy, so if you are unsure, just ask- although it is normally pretty obvious which way round you need to put the magnets.. The two colours are to show opposite polarities on the edge of the magnet which is going to be connected. Remember, red joins to blue. A hollow circle means that the magnet is on the other side (stupid sprue pictures). Note- the two on the torso for the head and the back are ‘shared’ on the picture by both sides of the torso, but in reality, there is one magnet for the head, and one for the back.
Step 8- The End?
Ok, now is the time to add any optional extras, such as toxin sacs, the spikes on the back, the tail weapons, the extended carapace, and/or the adrenal gland. Do it with magnets for full convertability- you will need tiny ones though. If not:
· Stick the toxin sacs on the arms which you will always use them on- perhaps on one pair of the scything talons? Or, if you don’t think you will use them, don’t put them on any. You can always stick them on afterwards
· If you are always going to use extended carapace, model the small plates onto the torso somehow, or even the legs- be creative
· If you want to put on tail weapons, do it, if not, then don’t…
· Adrenal glands are pretty cool, so you might as well stick one on to the plain torso, or if you want, stick smaller ones onto the other backs, or arms, or whatever. Do you what you feel like.
And then..
Paint it up, and stick the torso to the legs, and the legs to the base. Make sure it is in a good position, and one which gives room for the arms- especially the two arms weapons which aren’t as poseable as the others.
And enjoy your new magnetofex!
I will post up pictures of mine soon- hopefully by the end of the week.
Have Fun,
And remember kids,
Don’t talk to Tyranids,
Hive Lord