How to make a full size gaming table for $200
Feb 1, 2015 2:08:30 GMT
gigasnail, gunnersabottank, and 1 more like this
Post by sarvoc on Feb 1, 2015 2:08:30 GMT
Not sure where to post this but since those devoted to Converting and sculpting are fairly handy I figured this would be a good place.
I set out on a quest after 3 weeks of our games being cancelled at my friends house since he had things to do, I wanted to make my own table so we would have a fall back place to play for the rest of our group of 6 players.
This project took a total of 8 hours including time spent buying materials (and quite a bit of dicking around during the construction process) and was a 2 man job.
After 8 hours of work this was the final result!


The top is a 4x8 piece of cabinet grade plywood made from Roseburg fir with an $8 piece of 1/8 inch hardwood on top for looks. This piece of wood is also not attached it just fits snugly inside the frame so if it gets scratched by moving terrain and models around you can just pull it out and replace it at any time in a matter of minutes.
The frame was made with Kiln dried softwood pine at $16 dollars a board they come in 8' sticks so you'll need 3.
We used 4x4x4 banister posts ($20 dollars each) for the legs and cut about a foot off of each, yes the table stands on the ball ends and yes its stable because of what we did next.
Underneath the table are 4 2x4's (these can be cheap we used house cuts at $2.50 each) these run lengthwise down the center of the table and are secured to the frame and legs with 2" steel lag screws. Horizontally we use another piece of our Kiln Dried softwood pine to run under the table leg to leg to give some lateral stability and also secured these with 2" lag screws.
Once the frame and the legs with their supports were in place we attached 1/4" pieces of molding which had a bevel on one side and a nice lip on the other to the top of the frame all the way around the table using liquid nails. Molding prices will vary store to store we got 3 sticks for $30, the lip was placed ontop of the frame giving the table a slight sunk in look and will also serve to keep dice from rolling off the table without taking away any playing space. The beveled side drops low enough that it will cover any visible screws you have from putting your frame together which eliminates the need for plugs or wood putty.
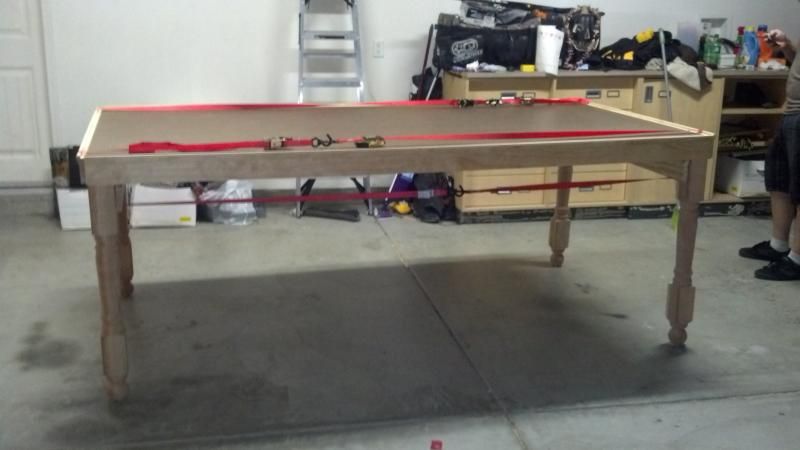
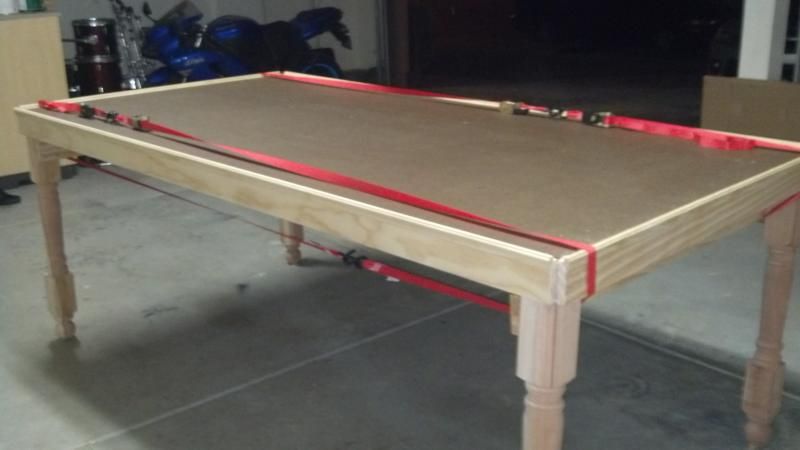
The pictures above were taken while we were waiting for the liquid nails to dry, we didn't have any clamps on hand so we just ran some tie downs from the truck to keep the molding pressed to the frame.
Sand lightly and stain the color of your choice or if you like the natural look rub a sealant over your table to protect it from spills and your done!
You can make a table for much cheaper than this but I wanted to keep it in the living room so a hunk of wood on a few 4x4's wasn't going to cut it. If anyone is looking to build their own table I hope this post helps you out!
I set out on a quest after 3 weeks of our games being cancelled at my friends house since he had things to do, I wanted to make my own table so we would have a fall back place to play for the rest of our group of 6 players.
This project took a total of 8 hours including time spent buying materials (and quite a bit of dicking around during the construction process) and was a 2 man job.
After 8 hours of work this was the final result!


The top is a 4x8 piece of cabinet grade plywood made from Roseburg fir with an $8 piece of 1/8 inch hardwood on top for looks. This piece of wood is also not attached it just fits snugly inside the frame so if it gets scratched by moving terrain and models around you can just pull it out and replace it at any time in a matter of minutes.
The frame was made with Kiln dried softwood pine at $16 dollars a board they come in 8' sticks so you'll need 3.
We used 4x4x4 banister posts ($20 dollars each) for the legs and cut about a foot off of each, yes the table stands on the ball ends and yes its stable because of what we did next.
Underneath the table are 4 2x4's (these can be cheap we used house cuts at $2.50 each) these run lengthwise down the center of the table and are secured to the frame and legs with 2" steel lag screws. Horizontally we use another piece of our Kiln Dried softwood pine to run under the table leg to leg to give some lateral stability and also secured these with 2" lag screws.
Once the frame and the legs with their supports were in place we attached 1/4" pieces of molding which had a bevel on one side and a nice lip on the other to the top of the frame all the way around the table using liquid nails. Molding prices will vary store to store we got 3 sticks for $30, the lip was placed ontop of the frame giving the table a slight sunk in look and will also serve to keep dice from rolling off the table without taking away any playing space. The beveled side drops low enough that it will cover any visible screws you have from putting your frame together which eliminates the need for plugs or wood putty.
The pictures above were taken while we were waiting for the liquid nails to dry, we didn't have any clamps on hand so we just ran some tie downs from the truck to keep the molding pressed to the frame.
Sand lightly and stain the color of your choice or if you like the natural look rub a sealant over your table to protect it from spills and your done!
You can make a table for much cheaper than this but I wanted to keep it in the living room so a hunk of wood on a few 4x4's wasn't going to cut it. If anyone is looking to build their own table I hope this post helps you out!


