How to expertly paint Hive Fleet Kraken
|
|
Post by krakenfiend on Sept 9, 2006 20:55:23 GMT
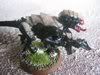
Hi guys, well I've had a lot of questions about my methode of painting and so on. I'm here to answer everyone's questions with this series of posts. I will show detailed photos of each step and materials used. First things First...what to paint....makes a big difference. I'm going to demonstrate my methode on a Gaunt because it is not too time intensive but will still be quite informative. Materials Needed: here all the paints used for a gaunt (not including white primer). 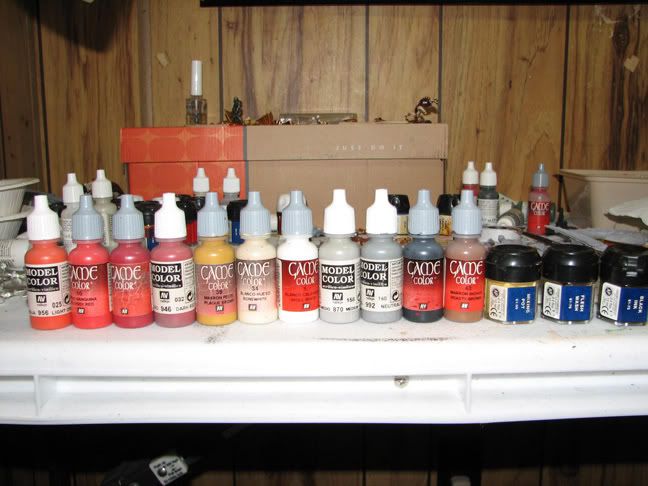 From Left to right.... Vallejo Model color LIGHT ORANGE Vallejo Game color BLOODY RED Vallejo Game color GORY RED Vallejo Model color DARK RED Vallejo Game color PLAGUE BROWN Vallejo Game color BONE WHITE Vallejo Game color SKULL WHITE Vallejo Model color MEDIUM GRAY Vallejo Model color NEUTRAL GRAY Vallejo Game color CHAOS BLACK Vallejo Game color BEASTY BROWN Citadel Game color 50% BUBONIC BROWN/ 50% BLEACHED BONE Citadel Game color FLESH WASH INK Citadel Game color BLACK INK Other supplies needed: Citadel Colour White Primer Citadel Colour Matte Varnish Paint Brushes (I use Vallejo 4/0, Reaper 20-0 and Citadel Small Drybrush) Clippers Hobby/Exacto knife Testor's Polystyrene Glue ZAP-A-GAP CA+ Super Glue Static Grass Model Flock Next Post.....Step One!....CLEANING UP AND FITTING THE MODEL! |
|
|
|
Post by hivefleetouroborus on Sept 9, 2006 21:02:13 GMT
wow can't wait for step two!!!
ps is all that what you need for 1 gaunt? dam im glad i collect a simple colour scheme.
|
|
|
|
Post by n00b1n8R on Sept 9, 2006 21:13:30 GMT
YAY!
can't wait for the next step. where do you buy vagelo colours?
n00b out
|
|
|
|
Post by krakenfiend on Sept 10, 2006 0:03:13 GMT
Ok here is step one: Model Clean Up First....Use clippers to Clip carefully clip the model from the sprue. Inspect the model for mold line and imperfections in the casting. Using A Hobby/Exacto Knife...scrape the mold lines away...GENTLY! The best technique is to place the blade perpendicular to the model and scrape away from you at an angle. Do this until the mold line disapears CAUTION...DO NOT CUT THE MODEL A dremel tool may be useful when shaving off large mold lines. Go over each piece of the model until you have done every piece. You will get pieces like in #1 below. After that...ensure each piece fits where it is supposed to... use model putty if needed...DO NOT ASSEMBLE YET! (Metal models need this much more than plastic since Polystyrene glue makes a Great plastic gap filler!) Step Two: Model Priming Generally I prime about 5-6 models at a time. But for this demonstration I'll do just one. Place the model pieces on a piece of flat cardboard. Shake the Primer very well...(1-1 1/2 minutes). -- Shaking the primer is very imortant..it will help ensure you get nice even coverage on the model. Spray the parts with short controlled bursts (almost like dusting). Allow the pieces to dry..(about 15 minutes for Citadel primer). Turn the pieces over and repeat the process. When complete..they will look like #2 below! 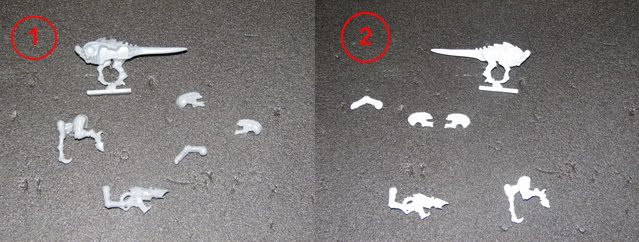 Next post I'll discuss appying the base coat and wash that form the shading depth for the model. |
|
|
|
Post by krakenfiend on Sept 10, 2006 3:52:45 GMT
Alright...step three is...Base coating. I chose Plague brown Vallejo game color because A. It is the same color used in the Third Edition Codex B. I can get it cheaper than Citadel C. It goes on better and coats better (has more pigment per drop) With a large brush (I use a small dry brush) start coating the white primed pieces of the model with the Plague Brown. The idea is to coat all the skin area with it and I do mean ALL. Don't over do it because you don't want to cover any of the model's details up (I usually thin mine down some with water and use two coats). This coat of Paint will give the strong base color required for the shading of the next step. Don't worry about neatness on this step...trust me. When finished it will look like #3 Below Step 4: Ink Shading This is the step where the model gets its dark brownish shading in the crevices. Ink of choice for me is Flesh Wash...but brown or chestnut could work too. Using a Large Brush (again I use a small drybrush for this), apply the Ink to the model's skin. Coat the model smoothly and evenly. Try not to get too much ink on the model (the idea again is to leave the details showing through). Pay special attention to the areas where carapace and skin come together (like the upper legs, head crest, and mid torso). You want to have a dark ink line where those meet so that the black of the carapace has a better transition to the bone color skin. If you get too much ink on the model, use a clean and dry brush to remove it (the brush will act like a sucking tool and suck up the ink). When you get done you should have something that looks like #4 below 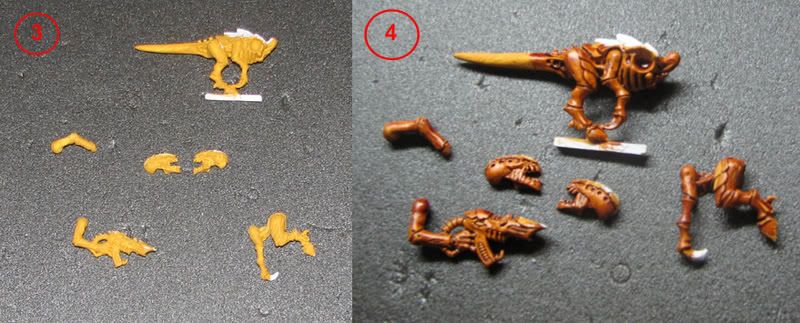 Next post will be the first high lighting stages |
|
|
|
Post by n00b1n8R on Sept 10, 2006 4:06:19 GMT
more more more!!
n00b out
|
|
|
|
Post by HDog on Sept 10, 2006 4:43:55 GMT
I vote this be stickied.
Edit- Now.
|
|
|
|
Post by hivefleetouroborus on Sept 10, 2006 16:08:17 GMT
keep going youve got us all bewitched now!
|
|
|
|
Post by krakenfiend on Sept 10, 2006 22:29:59 GMT
Now...onto step five: First Major High Light This is the Hardest and most important step of the whole model. If you can do this step the rest will be a breeze. Using a small brush (I use my Vallejo 4/0 brush here), apply the Plague Brown to the skin areas of the model. Neatness matters here. Good brush control is the key to most all good painting. When applying the brown, keep the paint on the raised areas of the skin (in other words don't get the paint into the crevices of the model). I don't try to do any subtle high lighting here..just bold paint strokes. Good even coating of the skin is important. Don't waste time trying to blend this first high light to the dark brown...just paint it on..trust me. Stick to the lines of the model and you will do fine. Pay speacial attention to the areas where the carapce meets the skin...leave the dark ink line showing for good seperation. Also the Flesh Borer is very detailed...pay close attention to it and try not to let any paint get into its crevices. But wait...you say you have made a mistake..? Well thats ok...I made many while painting these pieces...all you have to do is use the flesh wash to cover up the mistake. Once done you should end up with pieces that look like #5 below. I circled the areas to be very careful around as they are easy to mess up. 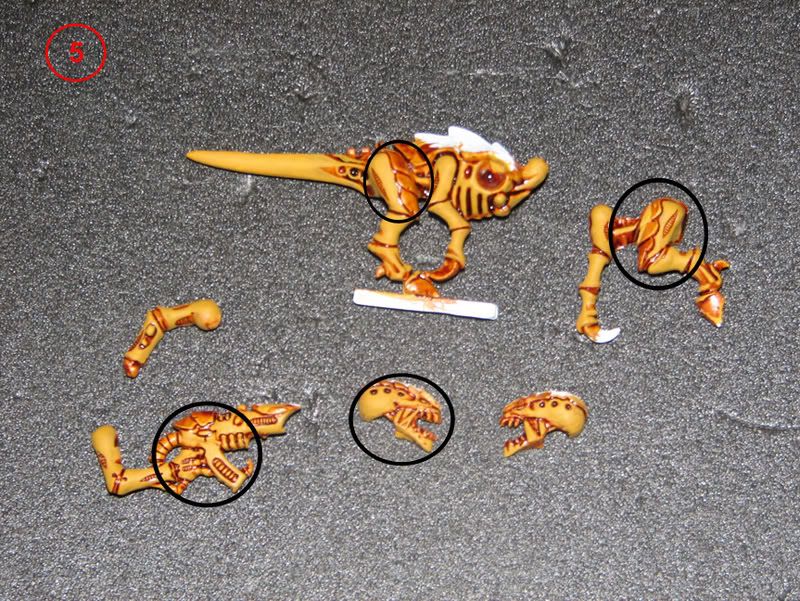 Next post will have the next skin high light and blending!..bleh |
|
|
|
Post by ohkay on Sept 11, 2006 3:14:00 GMT
wow, really! all those paint well go on a single gaunt?!
do you paint your army like this for every single model?!
umm. how much time do you spend each day painting?!
|
|
|
|
Post by n00b1n8R on Sept 11, 2006 7:27:08 GMT
*YOINK*
takes tips on painting.
more! more! more! this is usefull, even if youdon't do Kraken and should be stikied (with the name changed to how to paint tyranids and other people can do there scemes in it to)
n00b out
|
|
|
|
Post by krakenfiend on Sept 11, 2006 15:20:51 GMT
I know everyone is eagerly awaiting step six. Sorry but it might not be till this coming weekend.....I'm gonna be real busy with school. Don't worry I'm gonna finish so everyone can see what I do to achieve that "clean" look to a model. Step six...soon...I hope!?!  |
|
|
|
Post by hyperion on Sept 11, 2006 17:20:56 GMT
interesting  |
|
|
|
Post by krakenfiend on Sept 11, 2006 21:15:42 GMT
Ah ha!! I've got about an hour to drop here...so I'll hook you guys up early!... Step Six: Skin High Light 2 First thing I do is grab my 50/50 Citadel Mix (50% Bleached Bone and 50% Bubonic Brown). Why use Citadel?...Good question...Answer: Citadel paint sandwiched between the Vallejo paints helps bond all the layers together making the paint job more survivable to bumps and bangs. However..Citadel paints must be thinned down a lot! In fact..I need to change mine out completely because of all the chunkies mine has. Anyway....this layer is much like the last...except...it is a layered high light. Apply this layer much the same except leave some of the Plague brown showing near the edges of crevices. Also, this is a chance to do a little blending. Nothing too spectacular here just near the rib cage, tail and on the face. There are two blending techniques I use....repeated strokes and brush swapping. To use the repeat methode, you do not want a lot of paint on the brush. Just make repeated brush strokes until the color is blended at the edges with the lower color. Or, using the swapping methode, you paint a bold stroke (nice portion of paint on the brush) and then swap to clean brush and draw the paint to the edges. This technique is very difficult and I rarely use it. For the most part I use bold lines and paint strokes. These help to define the lines of the model very clearly. I like using more blending with the VERY last skin high light. If applied correctly you get #6 below. I circled points where I used some blending to help with the gradient. Also, notice how the flash shows very brightly on certain areas of the skin...that will give you a hint on the next part of the skin High Light. 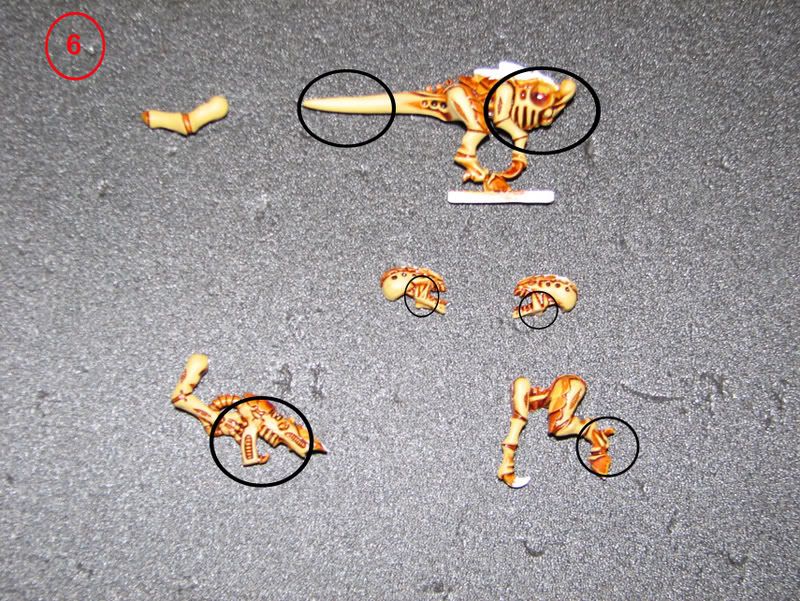 Next time I'll give the skin its last MAJOR coat...thats right...bone color....Don't know when that will be but...soon. |
|
|
|
Post by HDog on Sept 11, 2006 23:36:56 GMT
Man this is shiny
I'm going to PM someone for a sticky
|
|
This web site is completely unofficial and in no way endorsed by Games Workshop Limited.
Adeptus Astartes, Age of Sigmar, Battlefleet Gothic, Black Flame, Black Library, the Black Library logo, BL Publishing, Blood Angels, Bloodquest, Blood Bowl, the Blood Bowl logo, The Blood Bowl Spike Device, Cadian, Catachan, the Chaos device, Cityfight, the Chaos logo, Citadel, Citadel Device, City of the Damned, Codex, Daemonhunters, Dark Angels, Dark Eldar, Dark Future, the Double-Headed/Imperial Eagle device, 'Eavy Metal, Eldar, Eldar symbol devices, Epic, Eye of Terror, Fanatic, the Fanatic logo, the Fanatic II logo, Fire Warrior, Forge World, Games Workshop, Games Workshop logo, Genestealer, Golden Demon, Gorkamorka, Great Unclean One, the Hammer of Sigmar logo, Horned Rat logo, Inferno, Inquisitor, the Inquisitor logo, the Inquisitor device, Inquisitor:Conspiracies, Keeper of Secrets, Khemri, Khorne, Kroot, Lord of Change, Marauder, Mordheim, the Mordheim logo, Necromunda, Necromunda stencil logo, Necromunda Plate logo, Necron, Nurgle, Ork, Ork skull devices, Sisters of Battle, Stormcast Enternals, Skaven, the Skaven symbol devices, Slaanesh, Space Hulk, Space Marine, Space Marine chapters, Space Marine chapter logos, Talisman, Tau, the Tau caste designations, Tomb Kings, Trio of Warriors, Twin Tailed Comet Logo, Tyranid, Tyrannid, Tzeentch, Ultramarines, Warhammer, Warhammer Historical, Warhammer Online, Warhammer 40k Device, Warhammer World logo, Warmaster, White Dwarf, the White Dwarf logo, and all associated marks, names, races, race insignia, characters, vehicles, locations, units, illustrations and images from the Blood Bowl game, the Warhammer world, the Talisaman world, Age of Sigmar and the Warhammer 40,000 universe are either ®, TM and/or © Copyright Games Workshop Ltd 1975-2020, variably registered in the UK and other countries around the world. Used without permission. No challenge to their status intended. All Rights Reserved to their respective owners.