Post by Talonis on Jan 31, 2014 12:05:08 GMT
A few years ago, some people may remember I started a little thread called "Restoring the Fear".
This was based around Lictor tactics, and I feel it was a great success. Well with the new codex, new Dataslates and new rules, I am here again to keep records and bring light to what is in my opinion, one of 40k's coolest models / fluff.
I usually post battle reps with images showing how they move, what works and how I do it so you can see exactly some ways to best use the Lictor. This means that this will probably be Pic Heavy.
Colour guide for the images are:
Moving
Running
Charging
Hit and Run
Consolidating
So here is the Battle Rep, I will keep it more relevant to the Lictors roles in it, but I should say that the whole army works as a single combined force, as any army really should.
I have taken photos at the end of each player turn, and a few in-between to highlight some things. So without any more delay:
1750
Red Scorpions Vs Tyranids
Tyranids:
HQ:
Prime (Warlord): 200
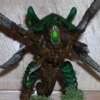
Scytal, BSwords, AG, Flesh hooks and the Norn Crown
Flyrant: 235
LW/BS Devourers
Troops:
2x 20 Termagants 160
2x 20 Hormagaunt 200
Fast attack:
Crone 165
Stinger salvo
Heavy Support:
Mawloc 140
Formations:
Deathleapers Assassin Brood 380
Gargoyle Bio-Bomb 270
3x 10 Gargoyles + 3x 6 Spores
Total 1750
Red Scorpions:
Commander Culln
Landraider
10 Terminators - Assault cannon, Heavy Flamer Combat squads
5 TH/SS Terminators (in Landraider)
Tac Squad
- Apothecary Sgt, Missile Launcher Plasmagun
- Razorback Twin Lascannon
Tac Squad
- Apothecary Sgt, Heavy Bolter, Meltagun
- Drop Pod - Locator Beacon
Siege Dreadnought
- Heavy Flamer
Mission: The Emperors Will
Deployment: Vanguard Strike
Red Scorpions have the First Turn.
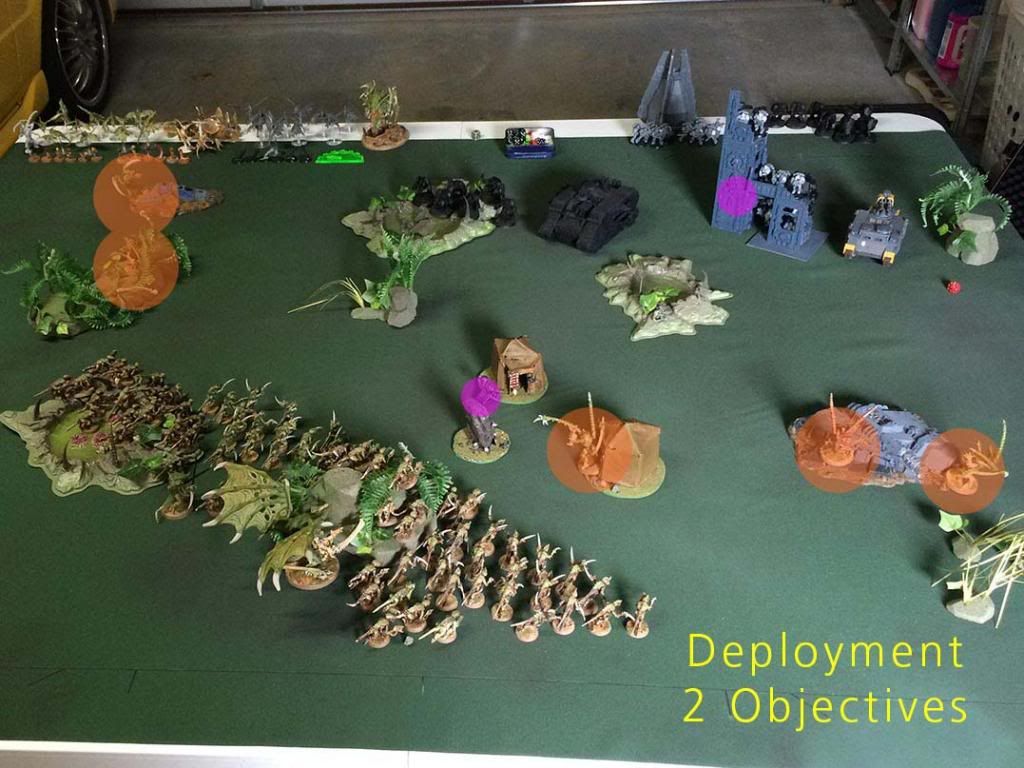
Deployment:
Red Scorpions Turn 1:
Night fighting was in effect the first turn, however the Lictors already had stealth. Their objective was a Skyfire Nexus. Deepstriking the Pod behind my lines to try and take out my Prime was something I didn't expect straight up... although some "look out Sir" and good saves on the Prime only killed 4 haunts from the Tac Squad. Orbital Barrage struck into the middle of the Gaunts only taking out a total of 8. Deathleaper and another lictor to the east went to ground, protecting them against Lascannons and Krak missiles, while the Lascannon from the Razorback killed the far east Lictor.
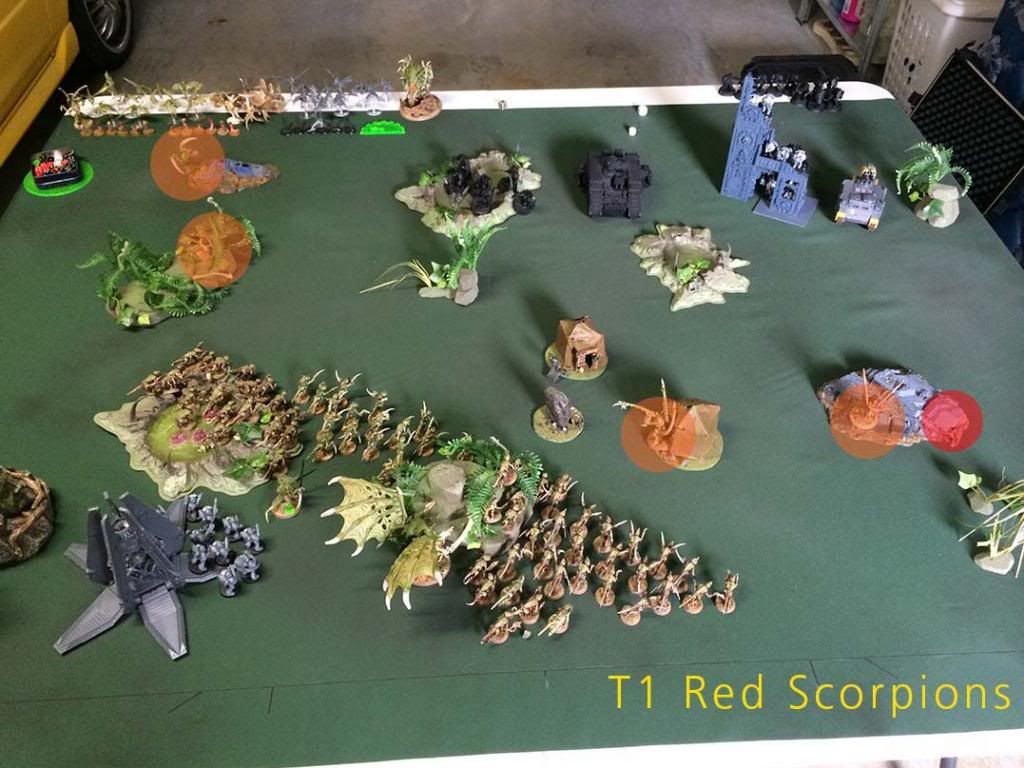
Tyranid Turn 1:
Most of the army moved forward, Lictors moved slightly but stayed in cover. The Western Lictor started to head south towards the Drop Pod Tac Squad. Flyrant destroyed the Razorback with twin Devs, while the Crone Immobilised and took 2 hull points off the Landraider. My Objective was nothing of interest...

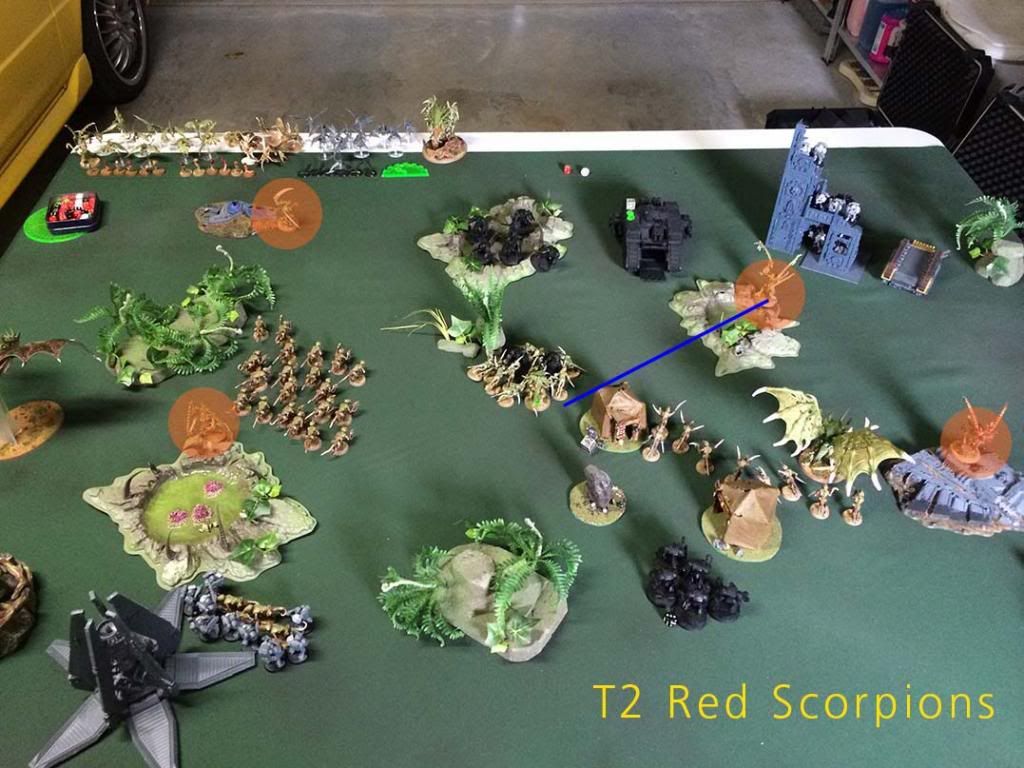
Red Scorpion Turn 2:
The second half of the Terminator squad deep striked behind the western Hormagaunts, and shot down half of them - Heavy Flamer + 4 stormbolters hurt. The TH/SS Assault terminators disembarked from the land raider, and with support fire from the terminators to their flank, charged into the Hormagaunts with the Prime in it... and here is a potential game changing moment: They multi charged the Deathleaper hoping to catch him while he is in the open with a solid Hammer hit. The Sgt issues a challenge The Deathleaper accepted (he was thinking the Prime would accept!) and with preferred enemy, the sgt was brutally torn to shreds by the Deathleaper, while the rest of the hormagaunts and Prime killed a further 2 terminators. Drawn combat, the Deathleaper hit and run towards the marines in the objective ruins.
A bit of shooting aimed at the Flyrant from the sky fire nexus, but the Flyrant dove and saved all but a single wound. It also passed its grounding. Power of the machine spirit tried to hit the Crone but failed.
Tyranid Turn 2:
Almost all of the Gargoyle Bio-Bomb formation arrived, only 1 brood of Gargoyles stayed in reserves. The Lictor appears in the terrain close to the enemies objective, and the Mawloc strikes the objective, although only 4 marines are on the ground floor to be hit with TftD - then mishaps and gets redeployed in the middle of my army.
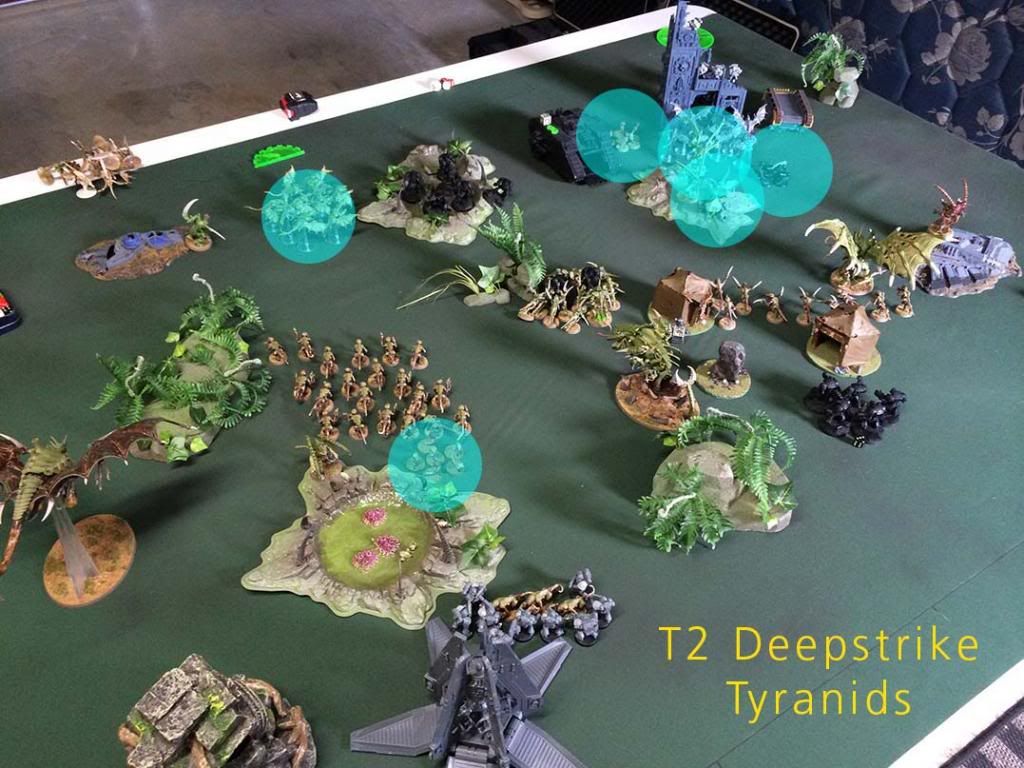
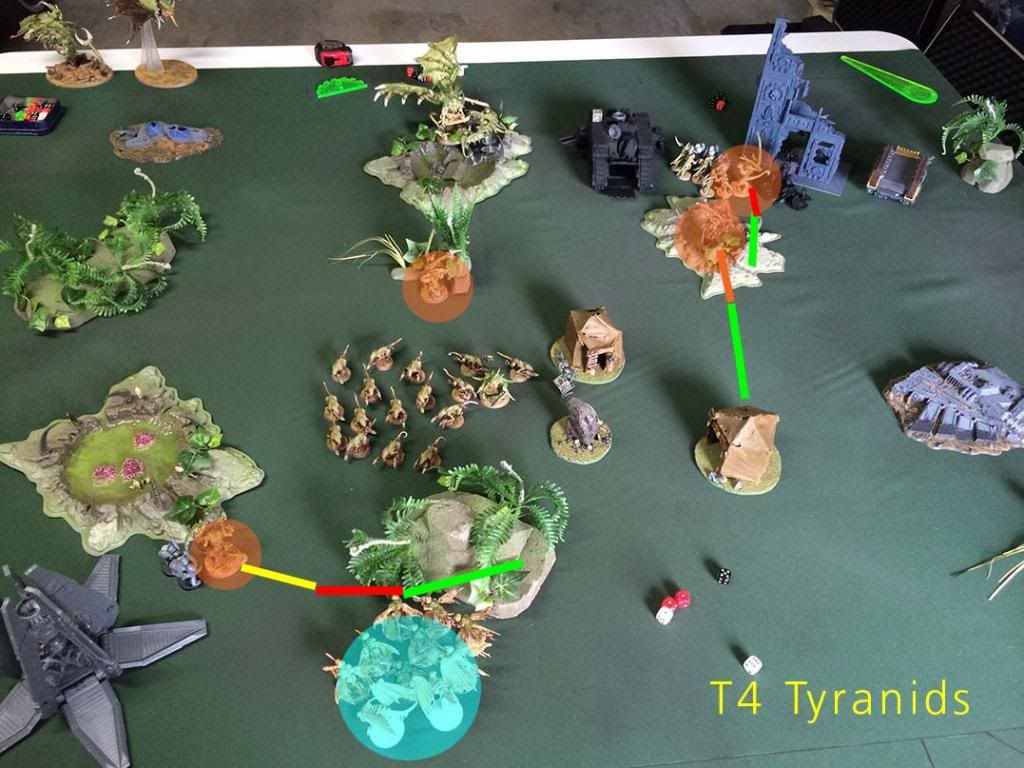
After guiding the deep striking units, the lictors begin to move around, setting themselves up for the next turn. The Crone swings around to the Terminators in the backfield, killing 1 while the termagants kill another.. Gargoyles doing nothing - both broods! The Lictor moving south springs itself upon the Tac Squad tied up by the termagants. Deathleaper swaps places with the newly arrived Lictor while the western lictor now moves out of cover up behind the gargoyles. The remaining hormagaunts charged the terminators which killed half of them to try and hold them in place.
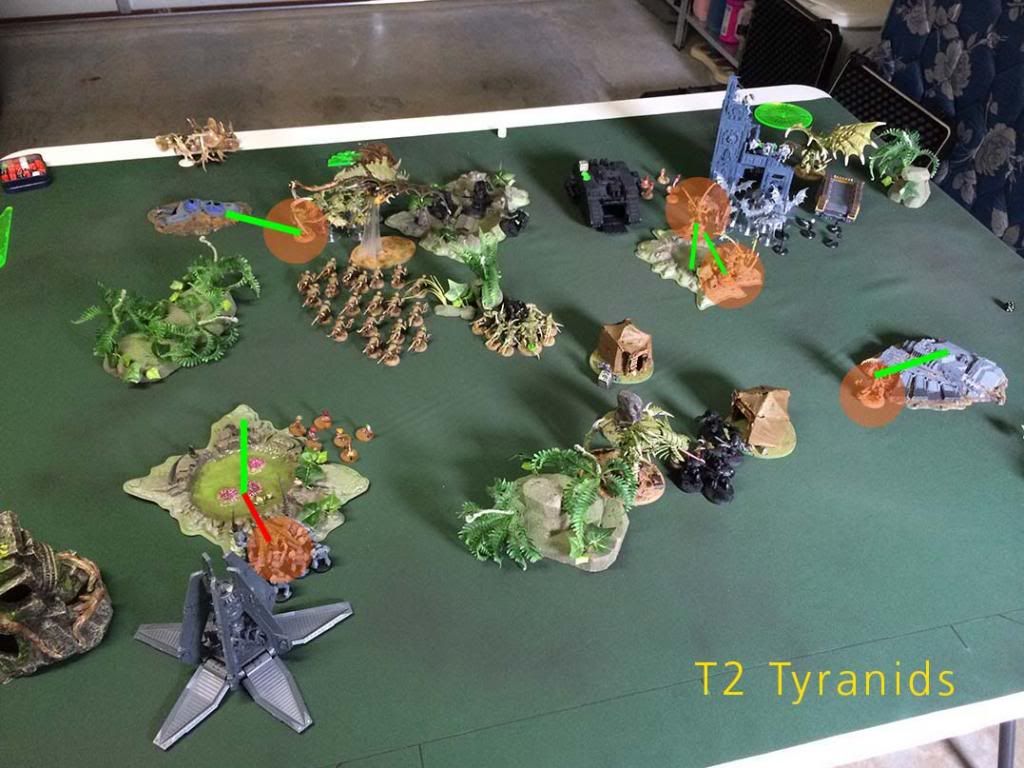
Red Scorpion Turn 3:
The siege dreadnought moved up behind the ruins to dual flame the gargoyles which just arrived, killing 7, then charged the remaining killing another 1. The Tac squad behind me finished off the termagants but was still held in place by the Lictor, which then hit and run back towards my central deployment.
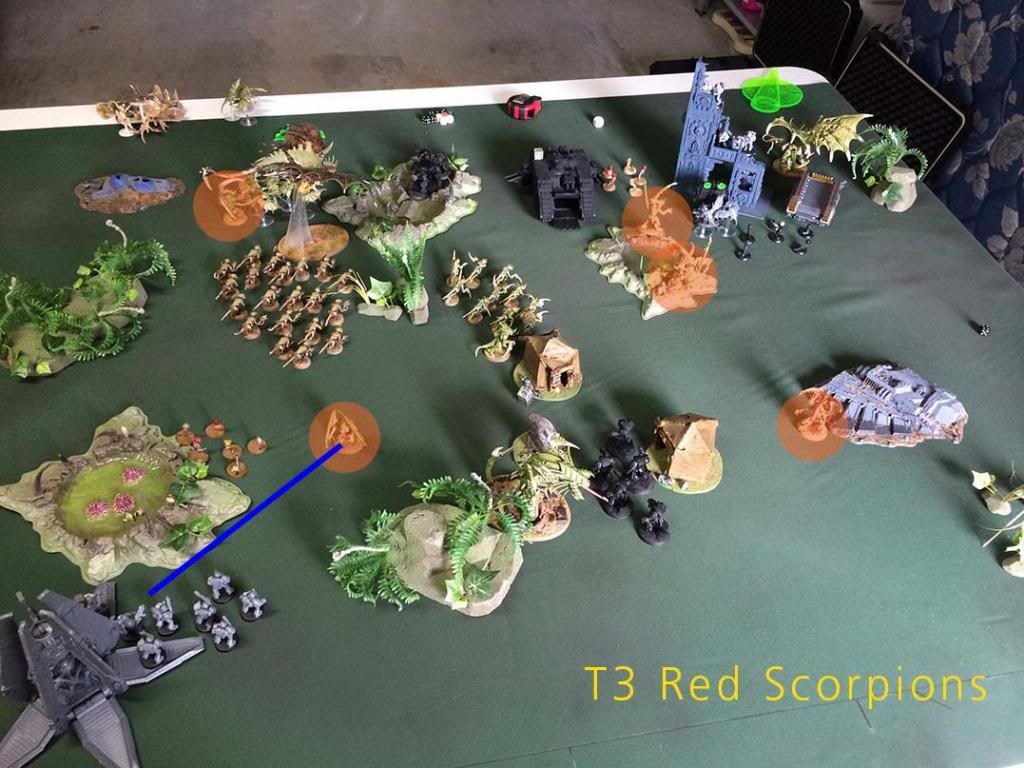
Tyranid Turn 3:
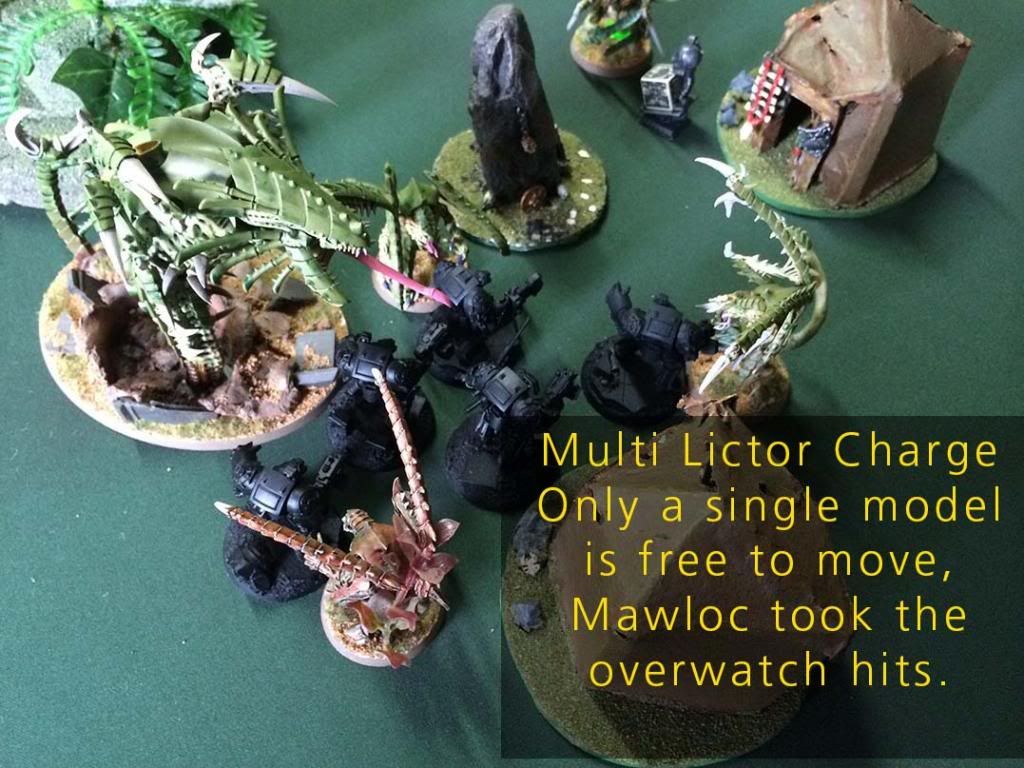
This is where things become interesting. First off, the hit and run lictor, Deathleaper, the eastern Lictor and the Mawloc all move in towards the terminators which deep striked in. The mawloc charged first taking the overwatch, while the 3 lictors all assaulted and were only in base with a single model, limiting the amount of attacks back at them. They killed 4 out of the 5 Terminators, leaving only the Mawloc left to kill one... which it didn't and took a wound instead. Deathleaper and 1 other lictor both Hit and Run, leaving the Mawloc and a single lictor to finish the terminator.
The Spore Mine Clusters around the Objective ruins both charged. 1 brood into the Dreadnough, and the other one into the Sgt on the ground floor. Overwatch from the tac Squad killed 2 mines, so only a single model is under the blast (We decided that only a single level of the ruins would be used to count the amount of models hit) and they made their save. The Dreadnough was hit with a S9 hit, penetrating and killing another gargoyle with the bio blast too.
The northern Gargoyles and Lictor all assault into the Terminators, which have Commander Culln attached. The gargoyles loose a couple of models to overwatch, and a few more flying in, but the HoW hits kill a terminator... and their attacks Blind the squad. The Lictor assaults into the Commander Culln, who decided to take the first hit, and rolls a 1... then fails a LoS roll taking another rending hit. Lictor caused 2 wounds to the Warlord! The Commander only causes a single wound on the lictor in return.
The Crone Vector strikes the Landraider scoring another 2 glances, turning it into a wreck. Then attempts to drool on the troops in the ruin, but Feel no Pain stopped any wounds.
Red Scorpion Turn 4:
The Tac squad holding the Objective in the ruins, decided it was charge or be charged, so they jumped down and pistoled then charged the Hormagaunts.
The line breaking Tac Squad decided to risk the spore mines, lined up to limit the hits and fired into the termagants, only killing a handful. The Drop Pod killed 2 Spore mines.
The Lone Terminator against the Mawloc and Lictor was killed, and the Lictor consolidated into the ruins... heading for the Tac squad in my deployment zone.
Tyranid Turn 4:
The Lictor guides in more gargoyles into my deployment zone, near the Tac squad then repositions itself to charge. The Spore mines also move to the other end to charge the same squad. Shooting from supporting broods kills a few marines, then the spores kill another, then the Lictor killed another again bringing the Tac squad to 3 men.
The Hive tyrant moves in to take out Commander Culln, but charging through cover sees the Tyrant taking a wound... before taking out the Commander. Again, the Gargoyles blind the unit.
The south Eastern lictor runs up while the lictor in front jumps in to support the hormagaunts near the objective, killing the missile launcher.
Red Scorpion Turn 5:
Things are looking dire, the Lictor takes out another 2 marines from the southern Tac Squad, leaving only the Sgt Apothecary to consolidate into the forest after the Lictor hit and runs again... this lictor has been terrorising this unit most the game! The other Tac Squad holds its own against the Lictor and hormagaunts near the objective. Combat with the last remaining Terminator in the north was a stale mate... but again the Terminator was blinded.
Tyranid Turn 5:
The Mawloc is guided to strike right into the heart of the combat with the last 4 remaining Tac Squad in the north, and kills only 3... and is able to deploy so doesn't get the second strike, but it did kill 3 of my own Hormagaunts... collateral damage.
Deathleaper makes an epic dash from the middle of the board to charge right into the lone Sgt Apothecary, and with preferred enemy easily takes him out without the Sgt even knowing what hit him.
The Lictor that was around the south west charged into the Drop Pod after the Crone vector strikes past dealing a hull point of damage, then the Lictor causing a Penatrating hit, exploding it 3".
The Flyrant cuts down the last Terminator.
The lictor against the final Sgt Apothecary in the north strikes with Preferred Enemy, killing him with no effort. The last Marine standing has fallen.
Tyranid Victory!
Vp 8 - 1
Tyranids: Linebreaker, Slay the Warlord, 2 primary objectives (3vps each)
Red Scorpions: First Blood (Lictor)
Thoughts:
Having all the lictors as individual units is a great way to help keep them alive and use them to support units already in combat. As I expected, from my experiences, hit and run will greatly increase their movements and get them into prime positions to strike again.
They hit hard... very hard, but you do need to support them.
The Gargoyle Bio-Bombs was actually pretty decent. Large amount of distraction units, and the new spore mine rules actually play out quite well. They can cut off approaches, hit multiple units when they explode and are cheap.
The only moral check failed by the Red Scorpions all game was a pinning check against the backfield Terminators... with Commander Culln. -3 Ld from Deathleaper + -1Ld from the Lictor nearby + -2Ld from The Horror meant that the squad had a massive negative to their Ld. Other than this, all game they passes failed combat checks and shooting casualties checks.
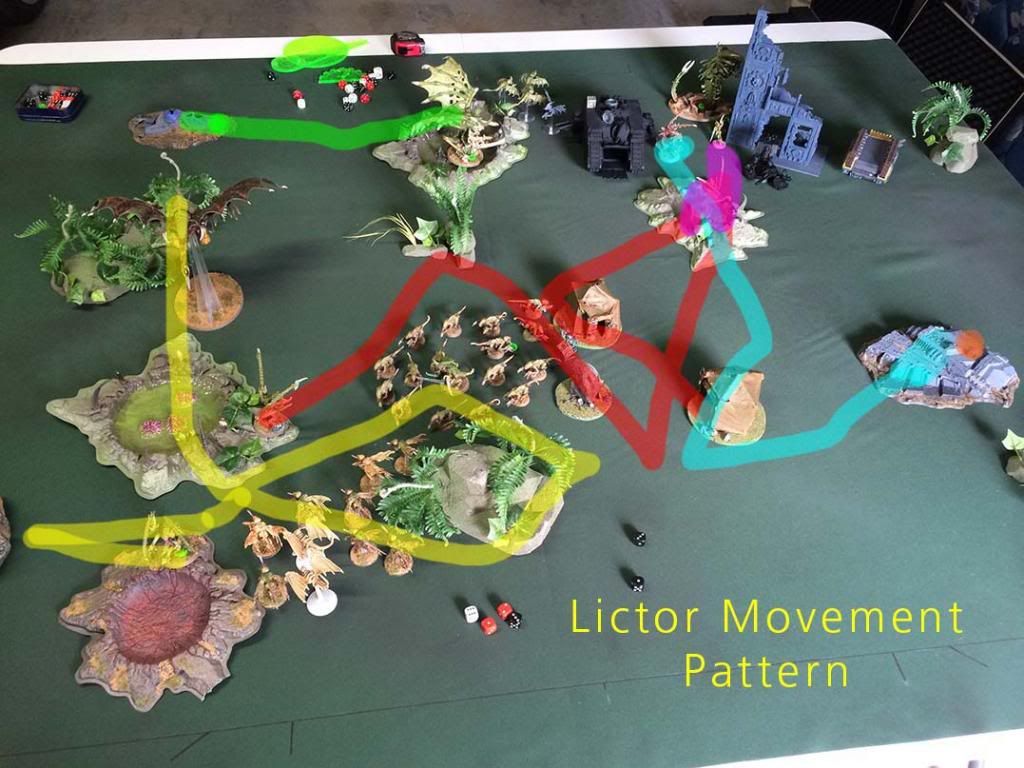
Just for fun, here is an overview of the movements of the Lictors through out this game. Deathleaper probably moved the most around, while the South West Lictor was probably MvL (Most Valuable Lictor)
I hope that this battle rep can help others to see some potential with both Lictors, and the new Data Slates too.
This was based around Lictor tactics, and I feel it was a great success. Well with the new codex, new Dataslates and new rules, I am here again to keep records and bring light to what is in my opinion, one of 40k's coolest models / fluff.
I usually post battle reps with images showing how they move, what works and how I do it so you can see exactly some ways to best use the Lictor. This means that this will probably be Pic Heavy.
Colour guide for the images are:
Moving
Running
Charging
Hit and Run
Consolidating
So here is the Battle Rep, I will keep it more relevant to the Lictors roles in it, but I should say that the whole army works as a single combined force, as any army really should.
I have taken photos at the end of each player turn, and a few in-between to highlight some things. So without any more delay:
1750
Red Scorpions Vs Tyranids
Tyranids:
HQ:
Prime (Warlord): 200
Scytal, BSwords, AG, Flesh hooks and the Norn Crown
Flyrant: 235
LW/BS Devourers
Troops:
2x 20 Termagants 160
2x 20 Hormagaunt 200
Fast attack:
Crone 165
Stinger salvo
Heavy Support:
Mawloc 140
Formations:
Deathleapers Assassin Brood 380
Gargoyle Bio-Bomb 270
3x 10 Gargoyles + 3x 6 Spores
Total 1750
Red Scorpions:
Commander Culln
Landraider
10 Terminators - Assault cannon, Heavy Flamer Combat squads
5 TH/SS Terminators (in Landraider)
Tac Squad
- Apothecary Sgt, Missile Launcher Plasmagun
- Razorback Twin Lascannon
Tac Squad
- Apothecary Sgt, Heavy Bolter, Meltagun
- Drop Pod - Locator Beacon
Siege Dreadnought
- Heavy Flamer
Mission: The Emperors Will
Deployment: Vanguard Strike
Red Scorpions have the First Turn.
Deployment:

Red Scorpions Turn 1:
Night fighting was in effect the first turn, however the Lictors already had stealth. Their objective was a Skyfire Nexus. Deepstriking the Pod behind my lines to try and take out my Prime was something I didn't expect straight up... although some "look out Sir" and good saves on the Prime only killed 4 haunts from the Tac Squad. Orbital Barrage struck into the middle of the Gaunts only taking out a total of 8. Deathleaper and another lictor to the east went to ground, protecting them against Lascannons and Krak missiles, while the Lascannon from the Razorback killed the far east Lictor.

Tyranid Turn 1:
Most of the army moved forward, Lictors moved slightly but stayed in cover. The Western Lictor started to head south towards the Drop Pod Tac Squad. Flyrant destroyed the Razorback with twin Devs, while the Crone Immobilised and took 2 hull points off the Landraider. My Objective was nothing of interest...

Red Scorpion Turn 2:
The second half of the Terminator squad deep striked behind the western Hormagaunts, and shot down half of them - Heavy Flamer + 4 stormbolters hurt. The TH/SS Assault terminators disembarked from the land raider, and with support fire from the terminators to their flank, charged into the Hormagaunts with the Prime in it... and here is a potential game changing moment: They multi charged the Deathleaper hoping to catch him while he is in the open with a solid Hammer hit. The Sgt issues a challenge The Deathleaper accepted (he was thinking the Prime would accept!) and with preferred enemy, the sgt was brutally torn to shreds by the Deathleaper, while the rest of the hormagaunts and Prime killed a further 2 terminators. Drawn combat, the Deathleaper hit and run towards the marines in the objective ruins.
A bit of shooting aimed at the Flyrant from the sky fire nexus, but the Flyrant dove and saved all but a single wound. It also passed its grounding. Power of the machine spirit tried to hit the Crone but failed.

Tyranid Turn 2:
Almost all of the Gargoyle Bio-Bomb formation arrived, only 1 brood of Gargoyles stayed in reserves. The Lictor appears in the terrain close to the enemies objective, and the Mawloc strikes the objective, although only 4 marines are on the ground floor to be hit with TftD - then mishaps and gets redeployed in the middle of my army.

After guiding the deep striking units, the lictors begin to move around, setting themselves up for the next turn. The Crone swings around to the Terminators in the backfield, killing 1 while the termagants kill another.. Gargoyles doing nothing - both broods! The Lictor moving south springs itself upon the Tac Squad tied up by the termagants. Deathleaper swaps places with the newly arrived Lictor while the western lictor now moves out of cover up behind the gargoyles. The remaining hormagaunts charged the terminators which killed half of them to try and hold them in place.

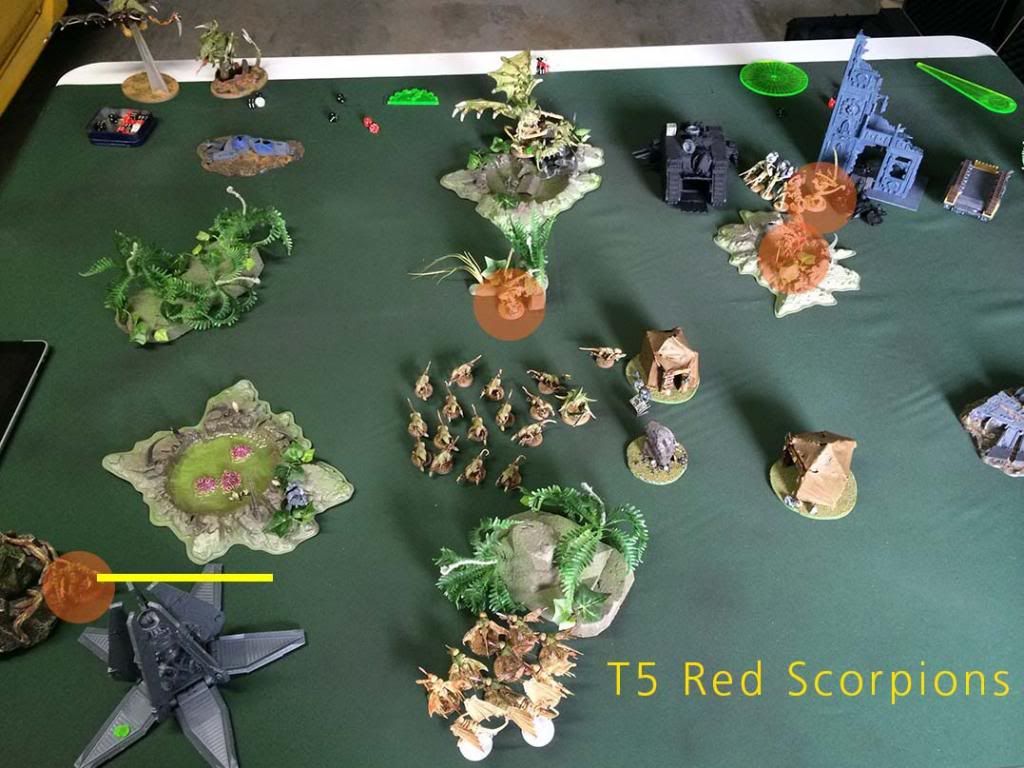
Red Scorpion Turn 3:
The siege dreadnought moved up behind the ruins to dual flame the gargoyles which just arrived, killing 7, then charged the remaining killing another 1. The Tac squad behind me finished off the termagants but was still held in place by the Lictor, which then hit and run back towards my central deployment.

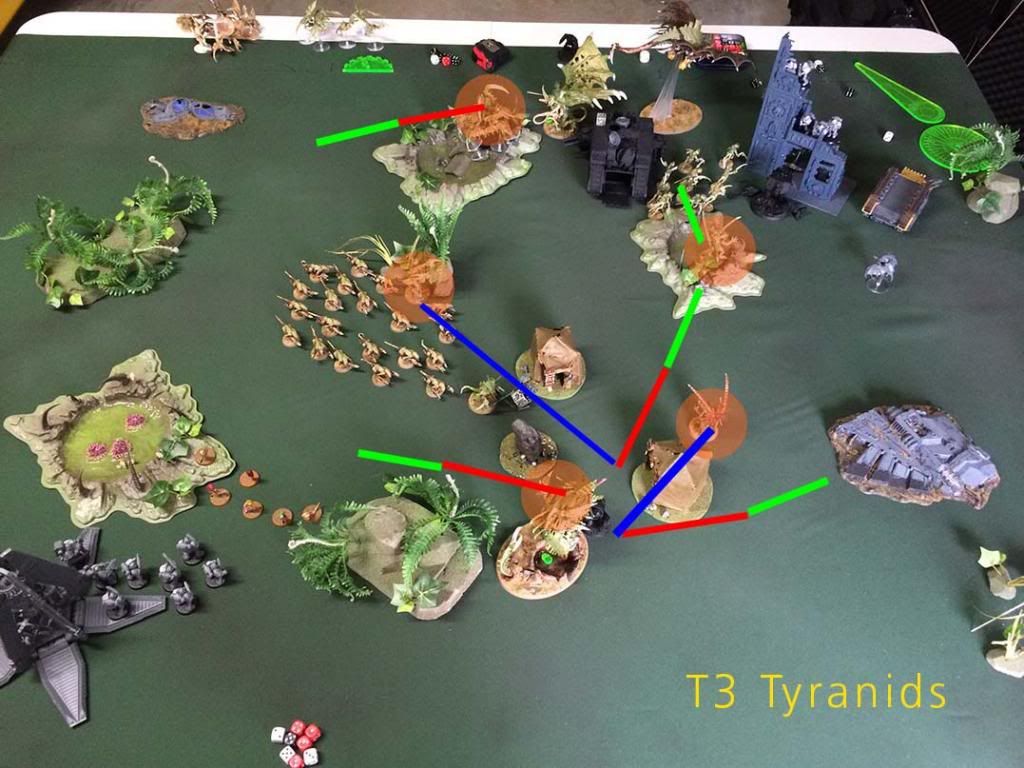
Tyranid Turn 3:
This is where things become interesting. First off, the hit and run lictor, Deathleaper, the eastern Lictor and the Mawloc all move in towards the terminators which deep striked in. The mawloc charged first taking the overwatch, while the 3 lictors all assaulted and were only in base with a single model, limiting the amount of attacks back at them. They killed 4 out of the 5 Terminators, leaving only the Mawloc left to kill one... which it didn't and took a wound instead. Deathleaper and 1 other lictor both Hit and Run, leaving the Mawloc and a single lictor to finish the terminator.


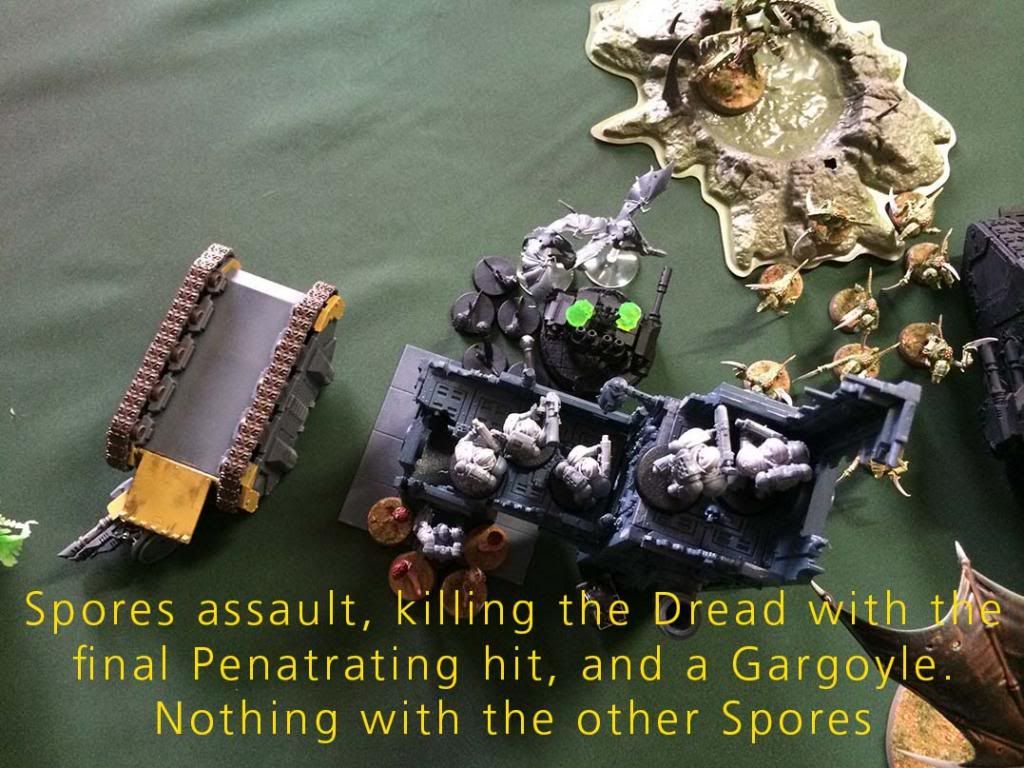
The Spore Mine Clusters around the Objective ruins both charged. 1 brood into the Dreadnough, and the other one into the Sgt on the ground floor. Overwatch from the tac Squad killed 2 mines, so only a single model is under the blast (We decided that only a single level of the ruins would be used to count the amount of models hit) and they made their save. The Dreadnough was hit with a S9 hit, penetrating and killing another gargoyle with the bio blast too.

The northern Gargoyles and Lictor all assault into the Terminators, which have Commander Culln attached. The gargoyles loose a couple of models to overwatch, and a few more flying in, but the HoW hits kill a terminator... and their attacks Blind the squad. The Lictor assaults into the Commander Culln, who decided to take the first hit, and rolls a 1... then fails a LoS roll taking another rending hit. Lictor caused 2 wounds to the Warlord! The Commander only causes a single wound on the lictor in return.
The Crone Vector strikes the Landraider scoring another 2 glances, turning it into a wreck. Then attempts to drool on the troops in the ruin, but Feel no Pain stopped any wounds.

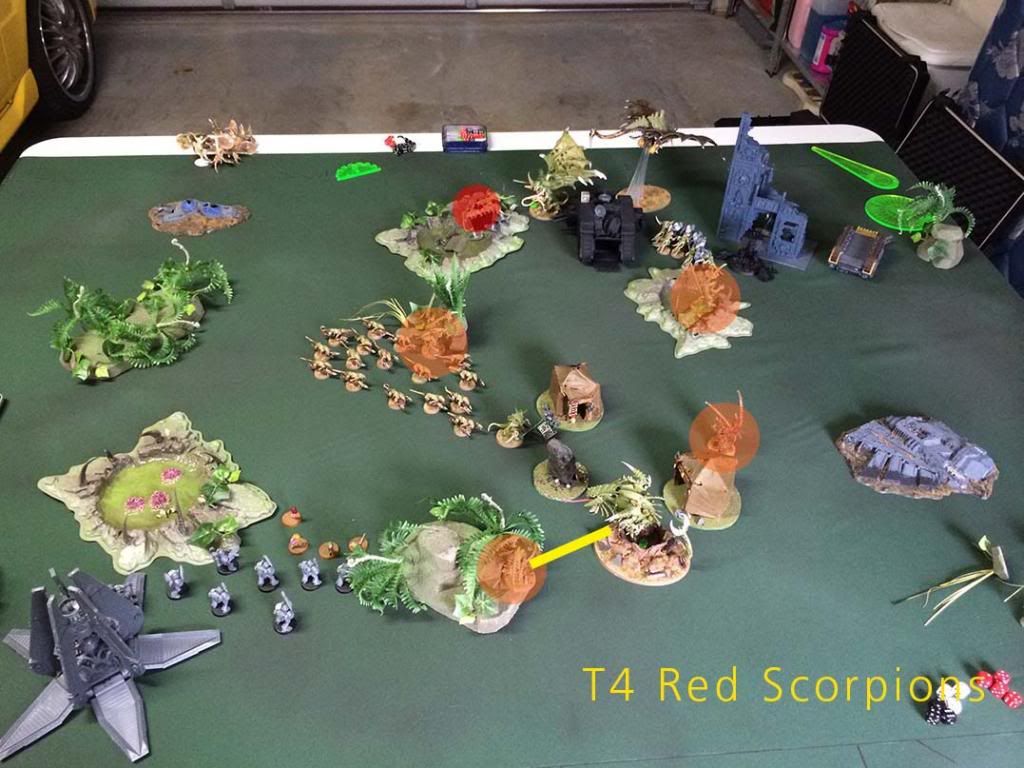
Red Scorpion Turn 4:
The Tac squad holding the Objective in the ruins, decided it was charge or be charged, so they jumped down and pistoled then charged the Hormagaunts.
The line breaking Tac Squad decided to risk the spore mines, lined up to limit the hits and fired into the termagants, only killing a handful. The Drop Pod killed 2 Spore mines.
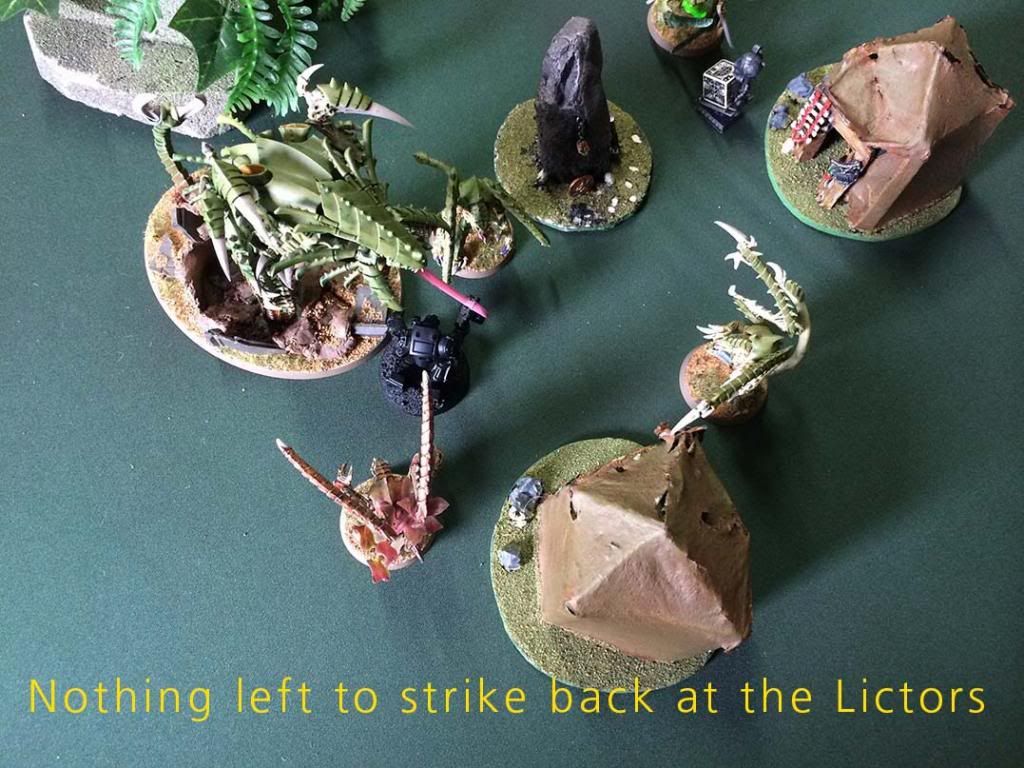
The Lone Terminator against the Mawloc and Lictor was killed, and the Lictor consolidated into the ruins... heading for the Tac squad in my deployment zone.

Tyranid Turn 4:
The Lictor guides in more gargoyles into my deployment zone, near the Tac squad then repositions itself to charge. The Spore mines also move to the other end to charge the same squad. Shooting from supporting broods kills a few marines, then the spores kill another, then the Lictor killed another again bringing the Tac squad to 3 men.
The Hive tyrant moves in to take out Commander Culln, but charging through cover sees the Tyrant taking a wound... before taking out the Commander. Again, the Gargoyles blind the unit.
The south Eastern lictor runs up while the lictor in front jumps in to support the hormagaunts near the objective, killing the missile launcher.

Red Scorpion Turn 5:
Things are looking dire, the Lictor takes out another 2 marines from the southern Tac Squad, leaving only the Sgt Apothecary to consolidate into the forest after the Lictor hit and runs again... this lictor has been terrorising this unit most the game! The other Tac Squad holds its own against the Lictor and hormagaunts near the objective. Combat with the last remaining Terminator in the north was a stale mate... but again the Terminator was blinded.

Tyranid Turn 5:
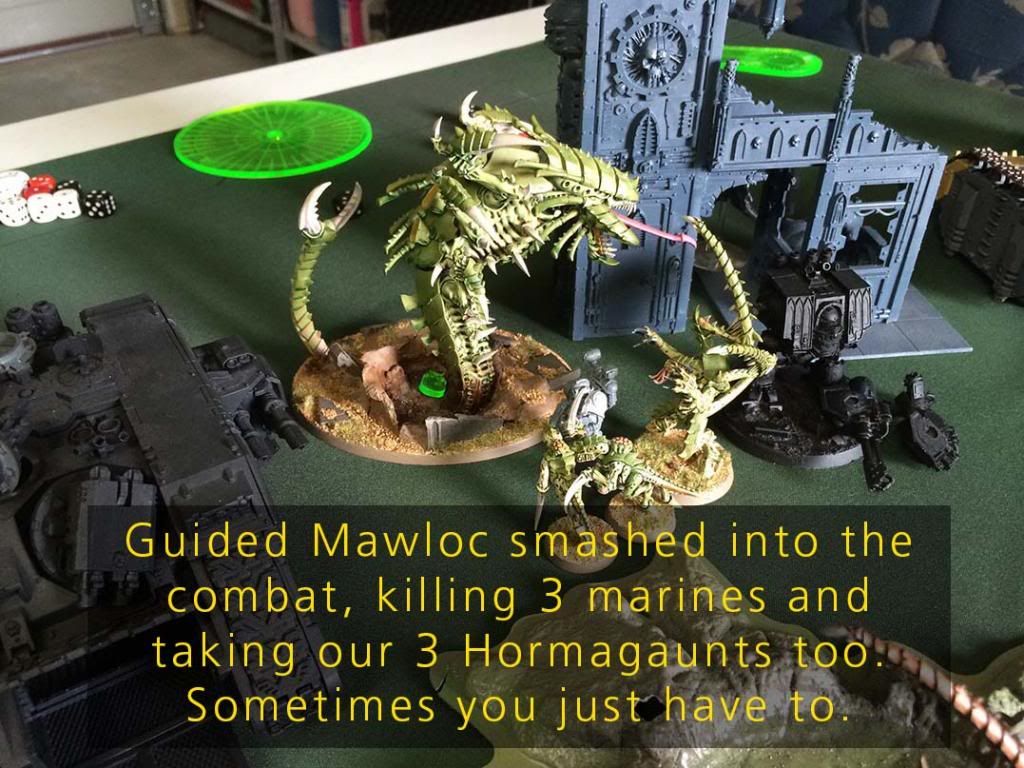
The Mawloc is guided to strike right into the heart of the combat with the last 4 remaining Tac Squad in the north, and kills only 3... and is able to deploy so doesn't get the second strike, but it did kill 3 of my own Hormagaunts... collateral damage.

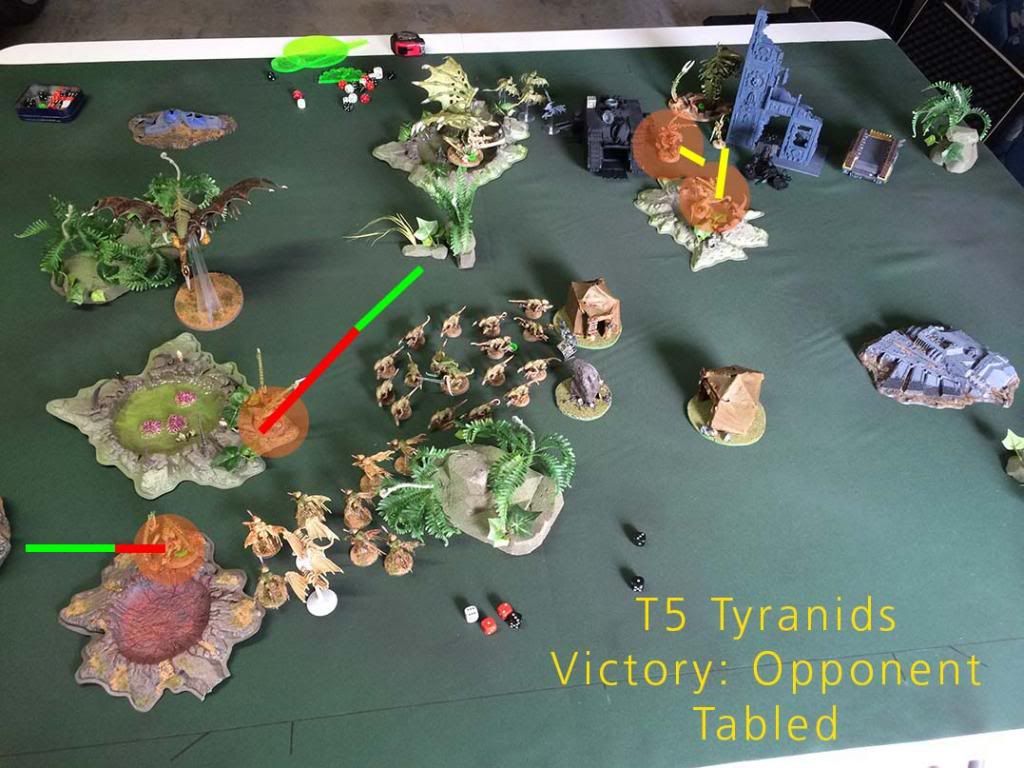
Deathleaper makes an epic dash from the middle of the board to charge right into the lone Sgt Apothecary, and with preferred enemy easily takes him out without the Sgt even knowing what hit him.
The Lictor that was around the south west charged into the Drop Pod after the Crone vector strikes past dealing a hull point of damage, then the Lictor causing a Penatrating hit, exploding it 3".
The Flyrant cuts down the last Terminator.
The lictor against the final Sgt Apothecary in the north strikes with Preferred Enemy, killing him with no effort. The last Marine standing has fallen.

Tyranid Victory!
Vp 8 - 1
Tyranids: Linebreaker, Slay the Warlord, 2 primary objectives (3vps each)
Red Scorpions: First Blood (Lictor)
Thoughts:
Having all the lictors as individual units is a great way to help keep them alive and use them to support units already in combat. As I expected, from my experiences, hit and run will greatly increase their movements and get them into prime positions to strike again.
They hit hard... very hard, but you do need to support them.
The Gargoyle Bio-Bombs was actually pretty decent. Large amount of distraction units, and the new spore mine rules actually play out quite well. They can cut off approaches, hit multiple units when they explode and are cheap.
The only moral check failed by the Red Scorpions all game was a pinning check against the backfield Terminators... with Commander Culln. -3 Ld from Deathleaper + -1Ld from the Lictor nearby + -2Ld from The Horror meant that the squad had a massive negative to their Ld. Other than this, all game they passes failed combat checks and shooting casualties checks.
Just for fun, here is an overview of the movements of the Lictors through out this game. Deathleaper probably moved the most around, while the South West Lictor was probably MvL (Most Valuable Lictor)

I hope that this battle rep can help others to see some potential with both Lictors, and the new Data Slates too.