How to expertly paint Hive Fleet Kraken
|
|
Post by Wrath on Sept 12, 2006 2:08:22 GMT
Second that. It's good to see a self help painting post.
|
|
|
|
Post by Yarrick on Sept 12, 2006 5:51:03 GMT
Man. Makes me wish I had a bone colored skin scheme.
|
|
|
|
Post by HDog on Sept 12, 2006 5:59:53 GMT
Just switch out the color as you deem apropriate. Mine is a shade lighter so thats what I'm doing.
|
|
|
|
Post by Yarrick on Sept 12, 2006 6:02:44 GMT
See my tyrant? Thats my scheme. Theres not much highlighting and washing you can do to black.
|
|
|
|
Post by krakenfiend on Sept 12, 2006 6:25:35 GMT
Step 7: Last Skin High light Well after this step....you should really start to see the color scheme coming together...lets get started! First...color...Vallejo game color Bone white of course! Use a small brush (my trusty 4/0 Vallejo) and just start layering the bone on top of the last coat. This is a high light coat so remember to leave some of the last coat showing at the edges of the crevices. Again I don't get too fancy with blending on this coat. However...you can easily blend the bone to the last coat especially on the tail, rib cage and face. In fact I, did do a little repeat stroke blending in the circled areas of the photo. Be very neat with this coat. It is easy to get too much paint on the model especially after using the thick Citadel paint and then switching to the thinner Vallejo color. Once again if you do make a mistake...your friend flesh wash ink will save you  . When you have covered all areas you will get something that looks like #7 below. I usually stop here with gaunts...but with bigger Tyranids I like to go one step farther and add a small bone white--skull white high light on the very edges of arms faces and weapons. This high light is really subtle and would be lost on a gaunt. 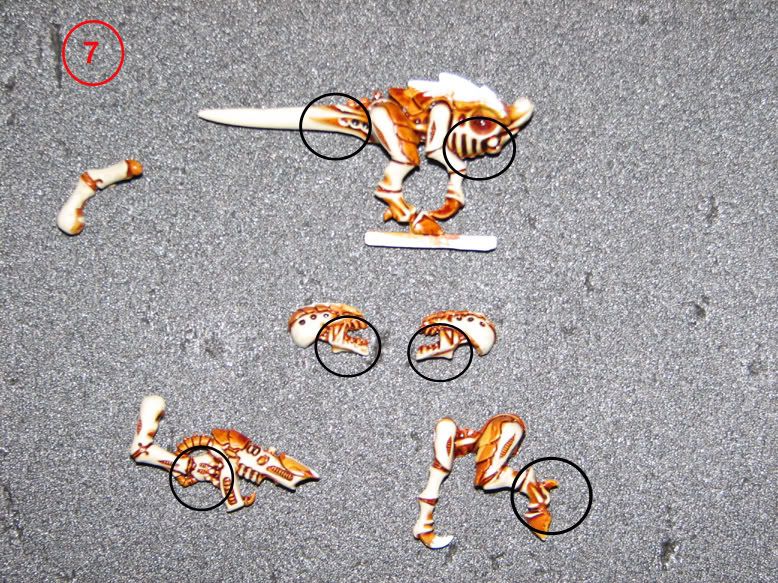 Next post I will start painting the long awaited carapace! |
|
|
|
Post by krakenfiend on Sept 12, 2006 6:45:52 GMT
Step Eight: Base coating the Carapace and mouth This is the second hardest step to me as it requires a good deal of brush control. You should be SUPER NEAT on this step because messing up here can have disasterous effects. First Lets get out the old Vallejo game color Chaos Black. Use a small brush (I use my 4/0) and begin painting the black onto the carapace. I like stating at the edges of the plates and working inward. Remember that dark ink line I told you about in the inking stage? It comes into play here. Basically that line is where you stop the black paint. This will give a gradient of bone to mix to Plague brown to ink to black carapace. That line is key when painting the head plates and the upper legs. Also the mid torso is a key area to concentrate on. The Flesh Borer is its own beast. Not only does it have plates but it also has an assortment of pipes, claws, and an eye ball to boot! Pay close attention to these details! Also make sure you paint the opening of the gun black (a small black circle will suffice). The hoof area should have a dark ink line to follow so it should be easy. Make sure you inspect the photo I took and look at all the black parts of the model. Painting the mouth is easy if the head is still in halves. This will let you get to the teeth as well as the inside of the mouth. Whew!! After all that black is applied you will get something that resembles #8 below! 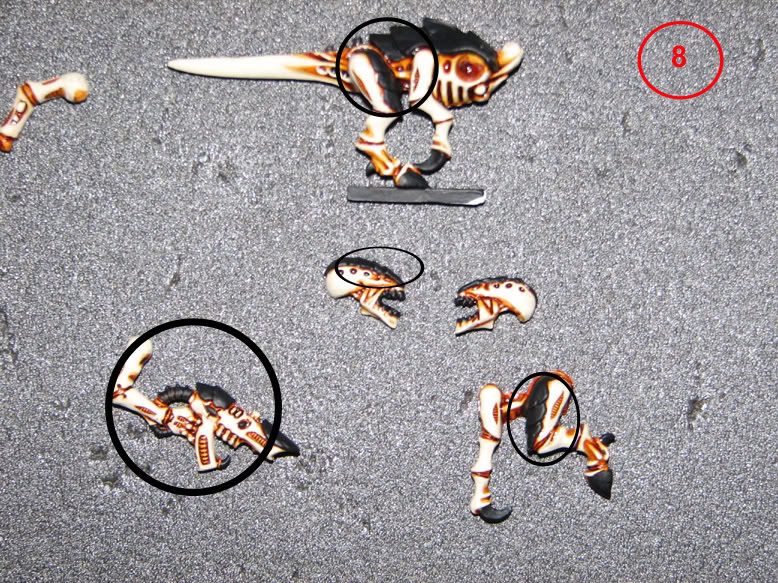 Ok...home stretch...all that is left is the red of the carapace, teeth, eyes, assembly and flocking...not to bad! |
|
|
|
Post by n00b1n8R on Sept 12, 2006 8:31:05 GMT
who on the forum isn't checking this out in the first 5 mins of opening the site? i sooo want to change shcemes... curse your goodness!! n00b out  |
|
|
|
Post by krakenfiend on Sept 12, 2006 9:32:15 GMT
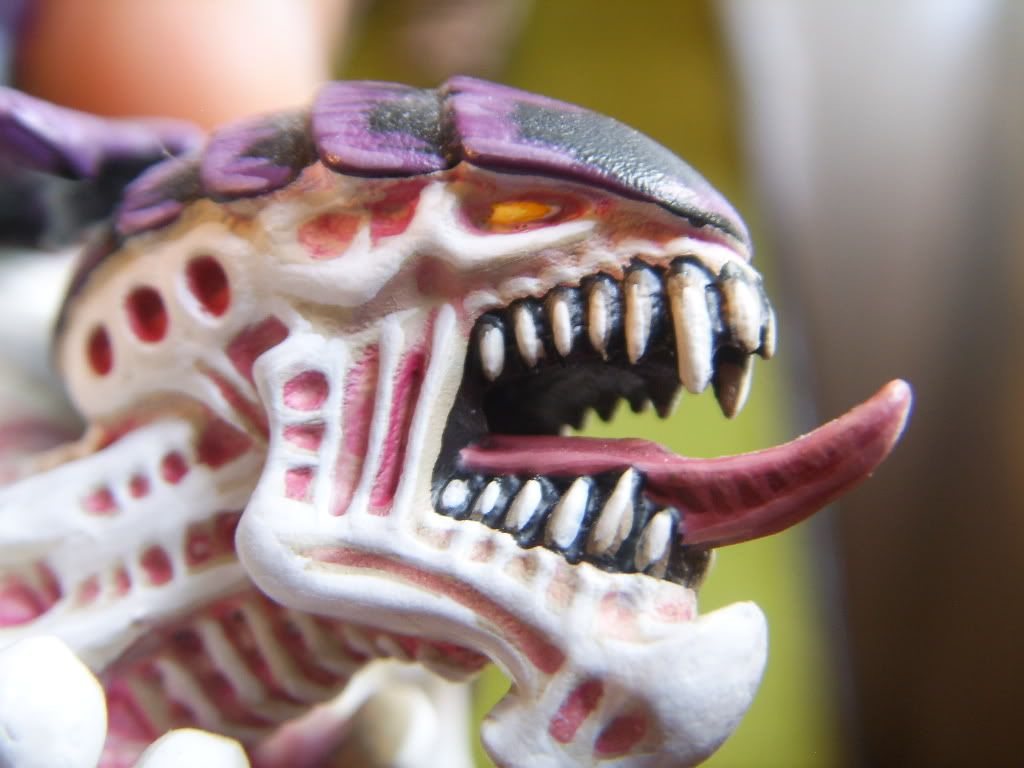
Steps Nine - Twelve: Carapace Texture Striping and other Red painting Well this is what most people want to see. To start I needed to mix some paint up. I mixed 5 parts Vallejo Model Color Dark Red to one part Black. This will give you a dark Burgundy color. Then Use a small brush (I used my Reaper 20-0 because its stiffer bristles allow for better line painting) and start at the diagonals of the carapace and paint a straight line towards the edge. You want the line to widen as you get closer to the edge of the Carapace. Then start painting one line right next to another until you cover the carapace with thin lines. I like to connect the ends of some lines together for a little more depth. This should give #9 below. Next I high light the lines with the Dark red paint by itself. I also Paint the claws, weapon pipes, and hooves this color. This will give you #10 Below. To further High light, I use Vallejo game color Gory Red. Just layer it on right on top of the dark red. Also high light the pipes, claws and hooves. You end up with #11 when done. Last but not least I use Vallejo game color Bloody Red for another high light to the Texture Strpes. I also High light the pipes, claws and hooves with Bloody red here too. This will give #12 Below. The key to these series of steps are good gradients, straight lines, and connecting a few together on the ends. I also like to give a little extra high light of Light orange (you don't have to) to make the ends of the lines really stick out. 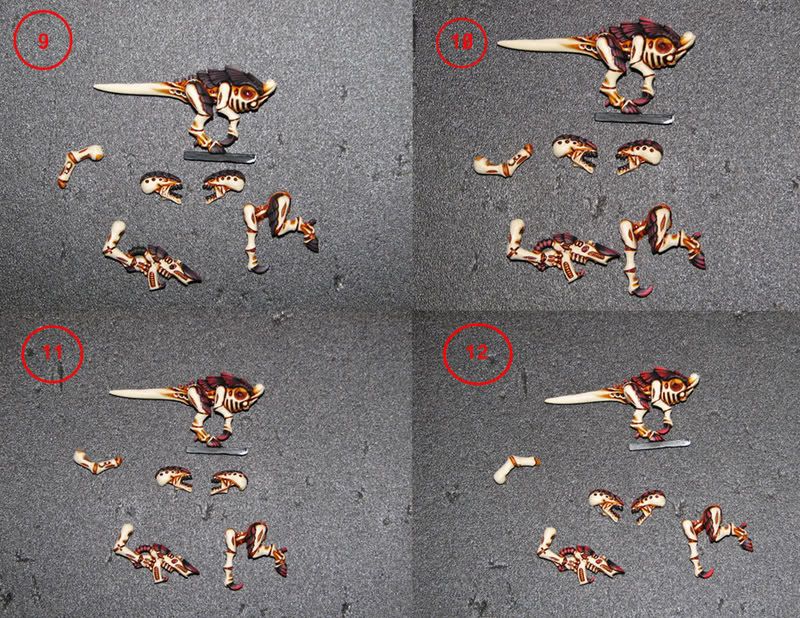 Next I'll go over painting the teeth and eyes |
|
|
|
Post by krakenfiend on Sept 12, 2006 9:40:25 GMT
Steps Thirteen - Fourteen: Teeth and Eyes These steps are really easy compared to what we have already done. First paint the Teeth with Vallejo Model color Neutral Gray. I also use Black Ink to darken the eye sockets. I also paint the tongue Gory Red for a base coat. This will give #13 Below. 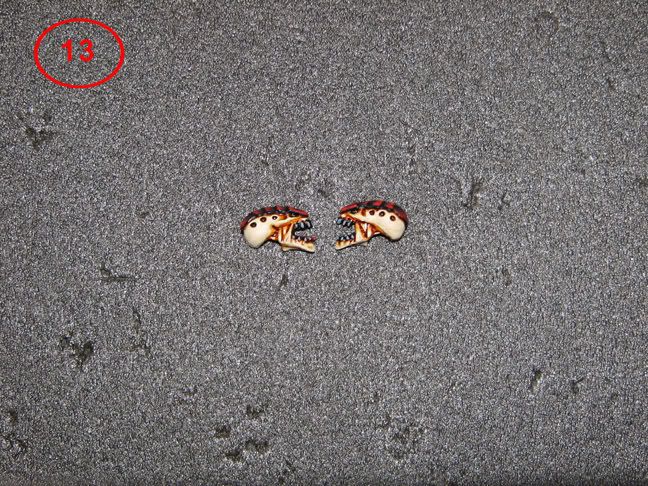 Next, hight light the teeth with Vallejo game color Skull white. Also paint a small dot of Bloody Red onto the eye. I used my Reaper Brush for this because of the stiff point it has. Also, High light the tongue with a 50% Gory Red 50% Skull white mix. Next continue adding Skull white to the mix of each sucscessive high light until you get a light pink color on the tip of the tongue. This will give you #14 below. 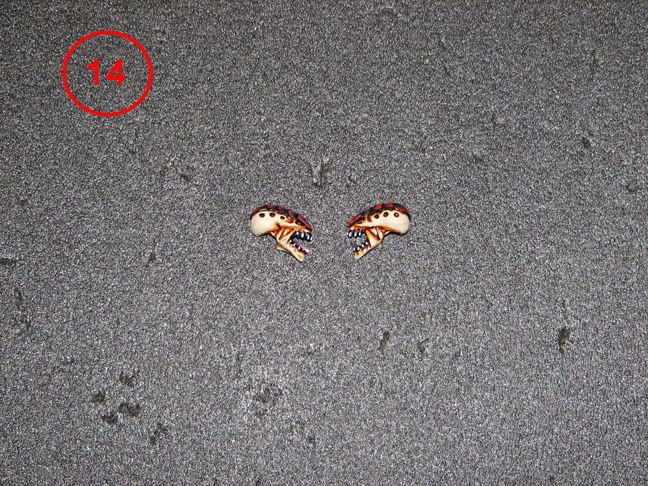 Next is Assembly, Varnishing, and Flocking |
|
|
|
Post by n00b1n8R on Sept 12, 2006 9:47:18 GMT
yay!
i <3 this thread. there should be more of them.
n00b out
|
|
|
|
Post by krakenfiend on Sept 12, 2006 10:38:40 GMT
Hah ha..almost done guys. Step Fifteen: Assembly and Varnish Pretty straight forward. I used my Testor's Polystyrene glue and glued the model into a nice pose. Then I used the Citadel Matte Varnish spray. Apply this spray just like the primer (shake well, short controlled bursts). Allow about 15-20 minutes for the Varnish to set up before handeling the model (you don't want to smudge the varnish). You will get #15 Below! Notice the dull sheen on the hoove...thats the varnish in action. I used flash photo to demonstrate the Varnish's dulling action...its sweet. 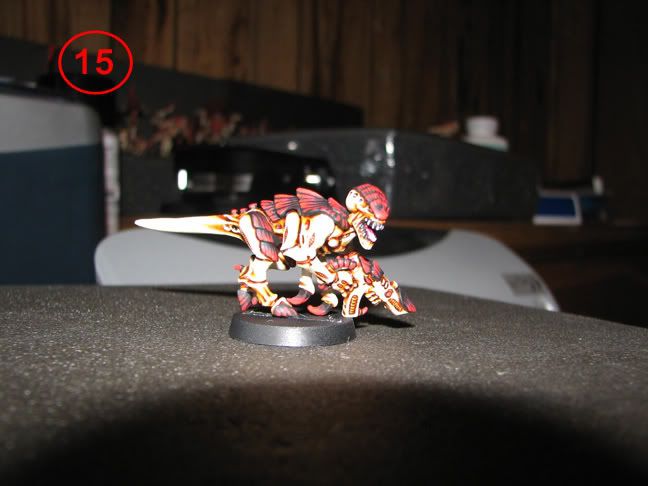 Last thing to do is Flock this guy and he shall be admitted into the swarm. Step Sixteen: Flocking Unlike all the books I don't use PVA glue for Flock. I use Zap-A-Gap CA+ Super Glue. WTF?? Why?...Simple...the bond formed by Super Glue is about 60X stronger than PVA Glue. Therefore you will lose less of your flock when the model is handled/transported whatever. Also the Zap-A-Gap spreads very easily over the base. So...I coat the base in the super Glue and stick it in the Flock bowl. Let that dry for about 5-10 minutes. Then I paint all of the Flock with Vallejo game color Beasty Brown.....let that dry. Next I dry brush Bone white over the top of the Flock. Now what?...STATIC GRASS. Put a drop or two on the flock and dip the model into the static grass bowl. Let that dry. For the last part I Use Citadel Dark Angels Green to paint the outside of the base. I have a special large flat brush for this. This gives you the finished Product....one Hive Fleet Kraken Gaunt #16 Below 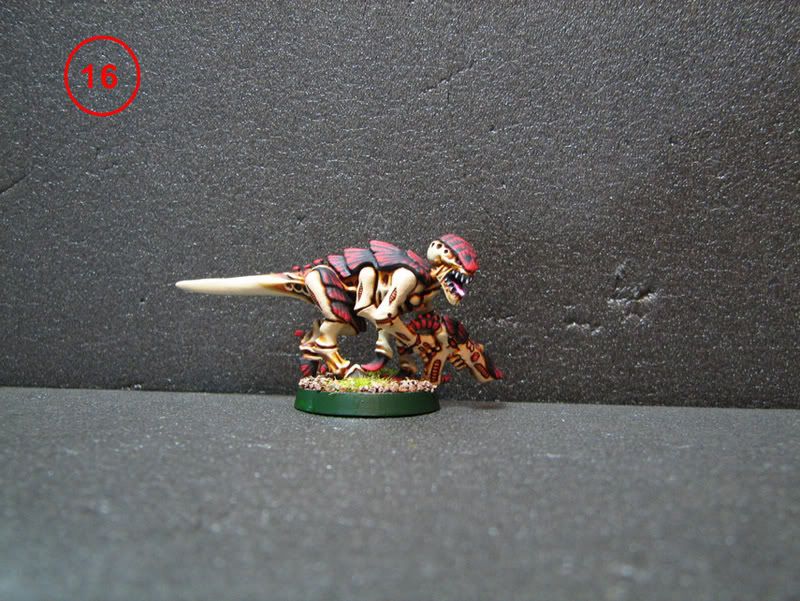 Well thats it. I hope this was helpful to everyone. If anyone has questions...just post them here or PM me...and I'll hook you right up. krakenfiend |
|
|
|
Post by rebmonk on Sept 12, 2006 18:19:45 GMT
bravo bravo, and thankyou for this.
something i have alot of trouble with and maybe you could do: scything talons? i have alot of trouble with them, and maybe do rending claws too.
|
|
|
|
Post by pluu on Sept 12, 2006 19:03:23 GMT
This is a GREAT tutorial!! Your Kraken sheme is the best i've ever seen, mabye even the best NIDS i've seen , close to the codex one, but naturally alot better/smoother painted and some own tweaks in it! Good Job!
Damn, I have to make a similar one guide for my leviathans (as noobinator so many times has asked me to)... (then all we need is a behemohth(or however you spell it) one)
|
|
|
|
Post by krakenfiend on Sept 12, 2006 20:35:22 GMT
Sure....maybe this weekend I'll put a small post on Claws and Talons
|
|
|
|
Post by n00b1n8R on Sept 12, 2006 21:07:41 GMT
all hale kraken fiend. all hail kraken fiend.
*incoming wayne's world referance*
WHERE NOT WORTHY *BOWS* WHERE NOT WORTHY *BOWS* WHERE NOT WORTHY *BOWS*
WHERE NOT WORTHY *BOWS* WHERE NOT WORTHY *BOWS* WHERE NOT WORTHY *BOWS*
WHERE NOT WORTHY *BOWS* WHERE NOT WORTHY *BOWS* WHERE NOT WORTHY *BOWS*
lol i love your sceme allmost as mutch as that movie.
n00b out
ps. pluu, your next
|
|
This web site is completely unofficial and in no way endorsed by Games Workshop Limited.
Adeptus Astartes, Age of Sigmar, Battlefleet Gothic, Black Flame, Black Library, the Black Library logo, BL Publishing, Blood Angels, Bloodquest, Blood Bowl, the Blood Bowl logo, The Blood Bowl Spike Device, Cadian, Catachan, the Chaos device, Cityfight, the Chaos logo, Citadel, Citadel Device, City of the Damned, Codex, Daemonhunters, Dark Angels, Dark Eldar, Dark Future, the Double-Headed/Imperial Eagle device, 'Eavy Metal, Eldar, Eldar symbol devices, Epic, Eye of Terror, Fanatic, the Fanatic logo, the Fanatic II logo, Fire Warrior, Forge World, Games Workshop, Games Workshop logo, Genestealer, Golden Demon, Gorkamorka, Great Unclean One, the Hammer of Sigmar logo, Horned Rat logo, Inferno, Inquisitor, the Inquisitor logo, the Inquisitor device, Inquisitor:Conspiracies, Keeper of Secrets, Khemri, Khorne, Kroot, Lord of Change, Marauder, Mordheim, the Mordheim logo, Necromunda, Necromunda stencil logo, Necromunda Plate logo, Necron, Nurgle, Ork, Ork skull devices, Sisters of Battle, Stormcast Enternals, Skaven, the Skaven symbol devices, Slaanesh, Space Hulk, Space Marine, Space Marine chapters, Space Marine chapter logos, Talisman, Tau, the Tau caste designations, Tomb Kings, Trio of Warriors, Twin Tailed Comet Logo, Tyranid, Tyrannid, Tzeentch, Ultramarines, Warhammer, Warhammer Historical, Warhammer Online, Warhammer 40k Device, Warhammer World logo, Warmaster, White Dwarf, the White Dwarf logo, and all associated marks, names, races, race insignia, characters, vehicles, locations, units, illustrations and images from the Blood Bowl game, the Warhammer world, the Talisaman world, Age of Sigmar and the Warhammer 40,000 universe are either ®, TM and/or © Copyright Games Workshop Ltd 1975-2020, variably registered in the UK and other countries around the world. Used without permission. No challenge to their status intended. All Rights Reserved to their respective owners.


 . When you have covered all areas you will get something that looks like #7 below. I usually stop here with gaunts...but with bigger Tyranids I like to go one step farther and add a small bone white--skull white high light on the very edges of arms faces and weapons. This high light is really subtle and would be lost on a gaunt.