
Post by halos on Sept 11, 2013 20:06:52 GMT
Sup Hive?
I'm back with a new Battle Report, this time showcasing the new(-ish) Eldar codex.
The game is 1850pts over a 4'x4' table. Not quite as much terrain coverage as you might like but such is life.
The mission is The Relic and the deployment your standard 12" board edge lanes for ease.
I haven't had much opportunity to play versus Eldar since their update, and my list is more geared towards dealing with Tau gunlines than anything, so the outcome is far from certain...
--/Lists/----------------------------------------------------------------------------------
Eldar
•HQ:
-Eldrad Ulthran
-Spiritseer
•Troops:
-5x Dire Avengers (Exarch)
-5x Rangers
-5x Rangers
-3x Windrider Jetbikes
-5x Wraithguard (D-Scythes)
~Wave Serpent (Bright Lance, Holofields, Spirit Stones)
•Elites:
-10x Fire Dragons (Exarch)
~Wave Serpent (Scatter Laser, Holofields, Spirit Stones)
•Heavy Support:
-Wraithlord (Bright Lance, Flamers, Wraithsword)
-Wraithknight (Suncannon, Scatter Laser, Shield)
-Fire Prism
Although not exactly one of them spam lists you see wiping tables this is by no means a bad Eldar list. No real poor unit choices in there. I'm not entirely sure what the 5 man Avenger squad is there for, maybe just as a mobile troops choice? To my mind a second Jetbike squad would serve better. Still, Wave Serpents are trouble even if there are only two of them. The Fire Dragons and Wraithguard are more than capable of making a real mess of any MC they come across.
Eldrad joins the Fire Dragons and rolls in the Runes of Fate psychic table, gaining Fortune, Guide, Misfortune and Doom.
The Spiritseer puts her lot in with the Wraithguard and rolls on Runes of Battle to get Destructor/Renewer and, uhh, the one which effects Run moves. (I don't know the codex psychic tables very well...)
Tyranids
•HQ:
-Tervigon (3 powers, Toxin Sacs, Adrenal Glands)
-Hive Tyrant (2x Devourers, Hive Commander, Wings)
•Troops:
-Tervigon (3 powers, Toxin Sacs, Adrenal Glands)
-Tervigon (2 powers, Toxin Sacs, Adrenal Glands)
-10x Termagants
-20x Termagants (Devourers)
~Mycetic Spore
•Elites:
-8x Ymgarl Genestealers
-Doom of Malan'tai
~Mycetic Spore
•Heavy Support:
-2x Biovores
-Trygon Prime
Strictly speaking this list is designed around countering Tau gunlines, hence the emphasis on heavy support elements entering play from reserves. Fortunately it is also quite flexible; although you could reserve all sorts of units you only have to reserve 3 (The Spore Pods and the Ymgarls) so depending on table set up and army composition I'm free to slice the reserves however works best. In this case only the necessities go in reserves; the Eldar list is relying on quite a lot of small units and I'm going to need strong table presence to deal with that from the get-go.
Most of the Tyranid psykers roll on the Biomancy table, but none of them roll well. I think every single one of them rolled Haemorrage at least once and ultimately they all end up with just one 'good' power each. The Warlord Tervigon has Warp Speed, the Flyrant Enfeeble, the 3 power scoring Tervigon Iron Arm and the last Tervigon Endurance.
The Doom attempts to roll Puppet Master from Telepathy because I think it's fun but fails, and so takes Psychic Shriek instead, so she can deal with Rangers or fortuned units without invulnerable saves.
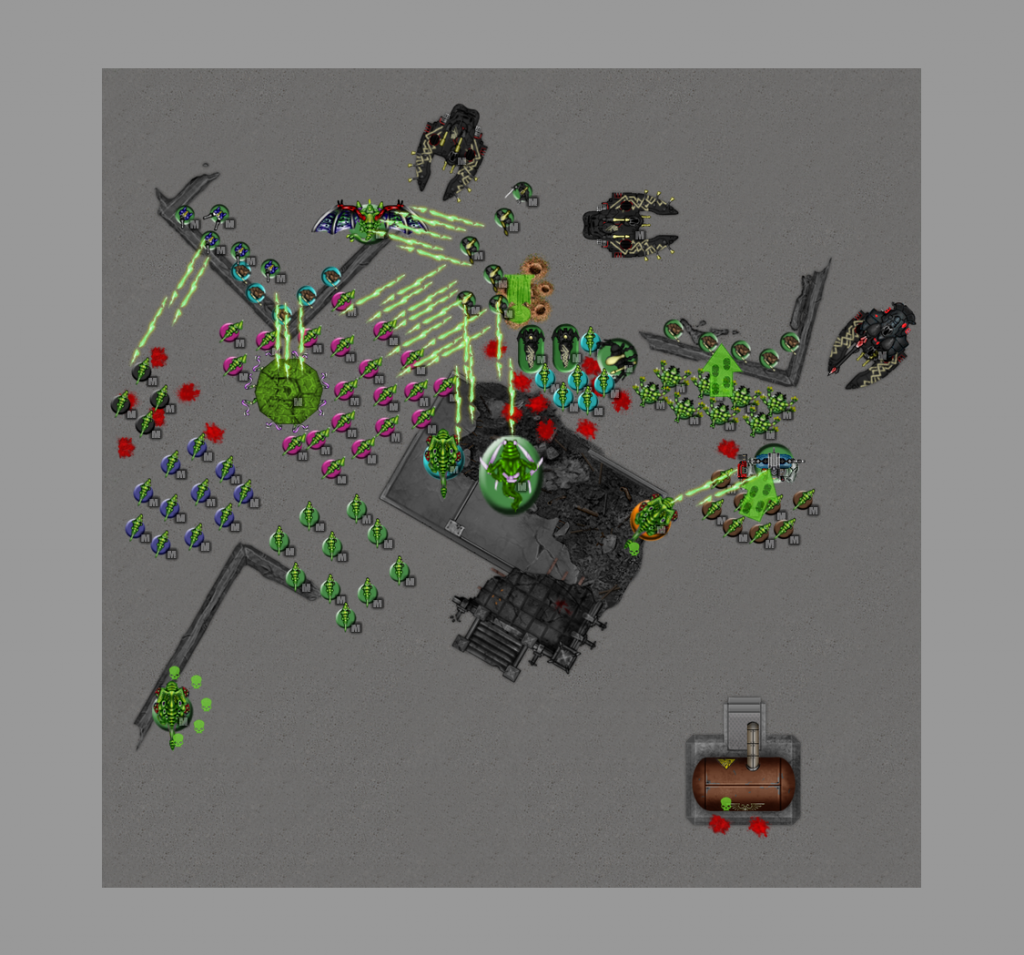
--/Deployment/-----------------------------------------------------------------------------------------
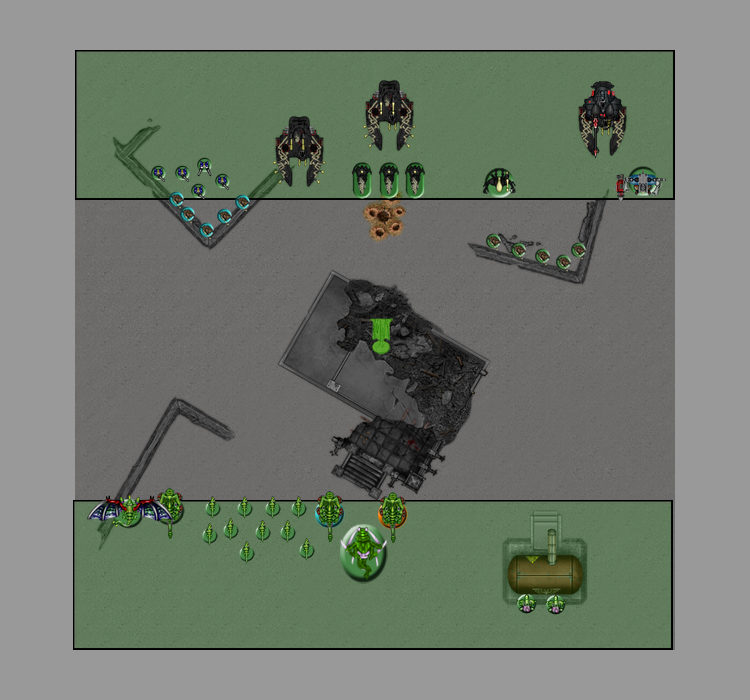
The Eldar win the roll to go first and set up as shown. I'm using a Dreadknight to represent the Wraithknight 'cos I don't have a Wraithknight sprite vailable.
The Jetbikes set up centrally to grab the relic as quickly as possible.
Eldrad is the Eldar warlord, and he comes with his own Warlord trait so no rolling there.
The Rangers infiltrate a few inches forwards to take advantage of some ruined parapets.
There is not as much terrain on the Tyranid table half; the Biovores are forced to hunker behind a barely adequate bunker structure.
The gants I leave out in the open in the vague hope of tempting my opponent to waste some firepower on them instead of on my valuable units.
The green Tervigon is the Warlord, which conveniently forces the first turn into Night Fighting, which might save a few wounds.
The blue Tervigon has Iron Arm and the orange Endurance.
The Flyrant hides mostly out of LoS for now in because I need her alive for the reserves bonus.
--/Turn 1 [Eldar 3 / Tyranids 0] /---------------------------------------------------------------------------
Eldar Turn 1:
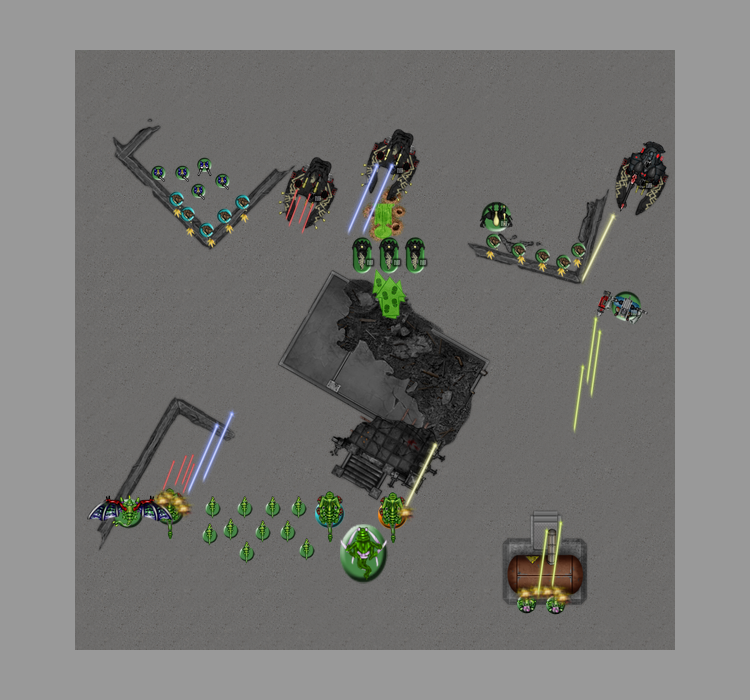
No Psychic powers are cast this turn; Eldrad's tank can already twin-link itself reliably enough and there's not much point Fortune-ing the Fire Dragons due to the Tyranids poor anti-tank weaponry.
The Jetbikes zip forwards into the central ruins to claim the Relic.
Everything else slips around to get better firing lines.
The shooting phase begins with the Wraithknight and Rangers killing one Biovore and wounding another, both units able to just spy the squat bioforms from their elevated vantage points.
The Fire Prism lances it's weaponry into the orange Tervigon, but is foxed by the dim light and protruding ruins.
Both Wave Serpents light up the dawn with their advanced alien firepower, flinging arcs of exotic energy into the warlord Tervigon. The lumbering beast suffers two wounds under the onslaught. The nearby Rangers neatly knock off a further wound.
The jetbikes roll a 10" assault jump move, but may only move 6" whilst holding the cumbersome Relic.
Tyranid Turn 1:
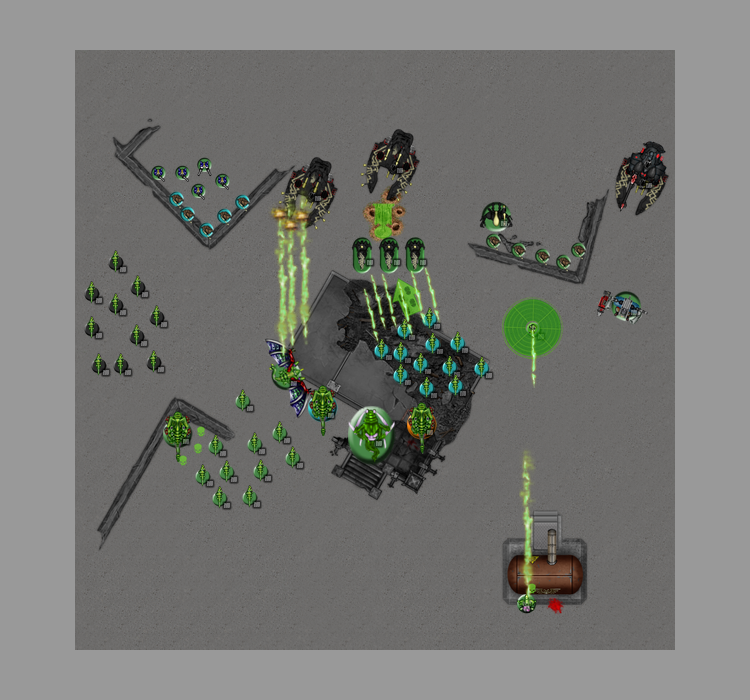
Endurance is cast on the warlord Tervigon, in the vain hope of protecting her from another volley of fire before I lose a VP.
The blue Tervigon Iron Arms up to T8.
The warlord Tervigon 10 gants up the left flank, seen as it's unlikely she'll last another turn.
The orange Tervigon disgorges 12 gants into the central ruins, slowed by the Relic, and lacking Hit and Run, the Eldar Jetbikes are unable to escape the nimble crowd of fanged horrors picking their way deftly through the rubble.
The movement phase has everything bar the Biovore surge forwards. It's vital that the Eldar are not allowed to control the board, one way of preventing this is to force them into their own deployment half. Most of their guns lack Rapid Fire so you don't suffer further damage and if you catch most Eldar squads with gants you can either kill them or stop them from doing too much for a while.
The Biovore attempts to achieve something by firing at the exposed Rangers, buuut obviously misses horribly. So horribly in fact that I get to place a Spore Mine! I have never gotten to do that before! I am unduly excited about it.
The spawned gants fire at the Jetbikes, but fortunately fail to kill them, I shouldn't have shot at them in the first place to be honest as I definantly don't want them fleeing.
The Flyrant takes some wistful shots at a Wave Serpent, but it's foiled by it's silly Eldar cover save.
The gants then charge into the Jetbikes, they lose some to Overwatch, and some more to combat wounds, but they succeed in killing one, and, more importantly, hold the Jetbikes there for at least one turn.
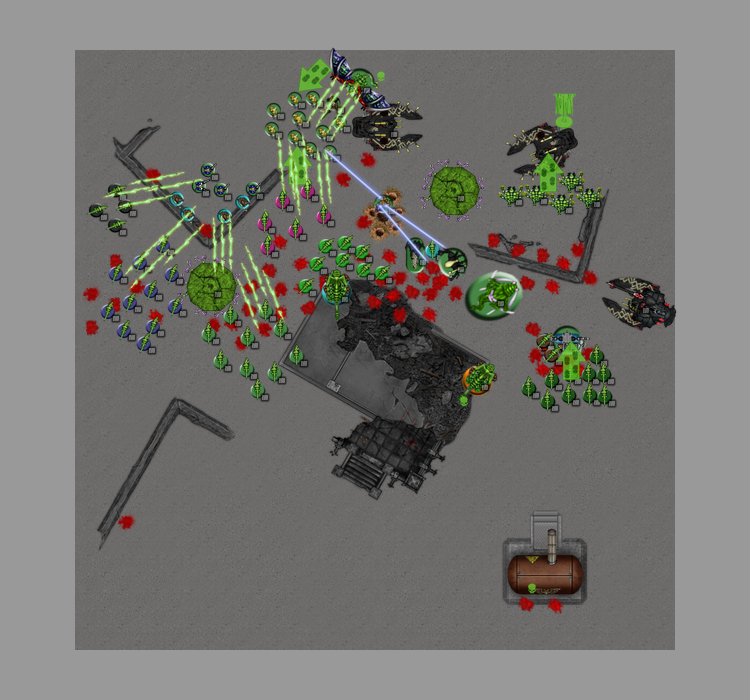
--/Turn 2 [Eldar 4 / Tyranids 0] /----------------------------------------------------------------------------------
Eldar Turn 2:
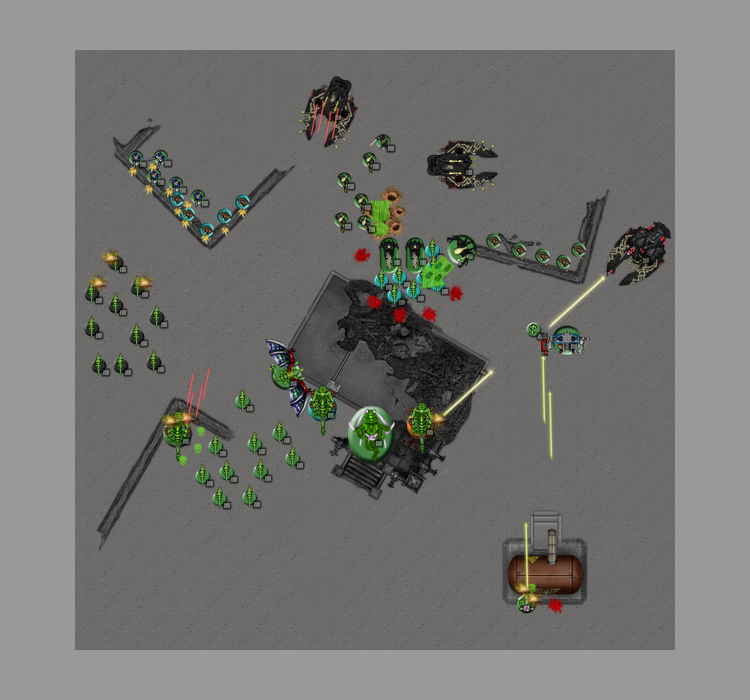
The Wraithlord stalks out of cover to assist the beleaguered jetbikes.
Meanwhile, much to my dismay, the Wraithknight jets next to the Spore Mine. The autonomous bombs lethal detonation splashes harmlessly off the constructs shins.
The Jetbikes drop the Relic, allowing it to be moved 1". This is followed by the Wraithguard disembarking from their transport and scooping up the fallen Relic. On the one hand this secures the relic, on the other it means the Wraithguard are now exposed and Wave Serpent-less.
The second Wraith Serpent sidles up to get LoS on the hiding Tyranid warlord.
The Wraithknight fells the remaining Biovore, scoring the Eldar the First Blood VP in the process.
Both Wave Serpents once again unleash their firepower into the Tyranid warlord. The hammering blows leave the Tervigon with just a single wound remaining. The left hand Rangers attempt to finish her off but cannot deal a mortal strike through the ruins and the beast unnatural Endurance.
The second Ranger squad cannot draw LoS to the warlord and so content themselves with firing into the orange Tervigon along with the Fire Prism, this proves an easier task now that dawn's light has truly risen and the Tervigon loses a wound.
The Dire Avengers exercise well practices combat drills and mow down ranks of gants, slaying six of the freshly spawned creatures.
The Wraithlord charges into save the Jetbikes. Outside of a Tervigons toxic aura the gants are unable to scratch the Wraith's gleaming structure and so attempt to drag down another Jetbike, but are unable to do that either. Fortunately the combined Eldar assault doesn't fare much better and only 2 gants are slain, both by the Wraithlord.
Tyranid Turn 2:
Rolling for reserves sees the devourer Gants and Ymgarls show up. Could have done with the Doom to help deal with those Wraithguard, but you can't have everything.
Once again Endurance is cast on the wounded Tervigon, hoping to stave off her death another turn.
The Flyrant attempts to Enfeeble the Wraithguard but fails to cast.
The Ymgarls had secreted themselves in the central ruins, I had hoped the relic might have stayed in there a little longer, but no matter, all the fighting has roused the Genestealers and they're hungry for violence.
The warlord spawns ten more gants, I suspect these will be the last lot she'll be spawning this game.
Although I am quite annoyed that my free Spore Mine didn't get to do anything in destroying it the Wraithknight has wandered a little too close to the orange Tervigon, who happily flings a bunch of gants in it's direction.
Unfortunately that does mean I've run out of spare gants so I probably won't be able to keep the Jetbikes locked down much longer.
The devourer Gants land to threaten the Wraithguard and also close of a whole swathe of the battlefield, the Flyrant swoops across the board, now in a prime position to either assist with taking down Wraithguard or shooting out the back armour of a Wave Serpent.
The warlord limps backwards, sensing her imminent demise she tries to keep her death throes from damaging the nearby gants.
The Ymgarls break cover to hunt down some Rangers, as well as being a threat to the many MCs on the board these units are scoring and, like most Eldar, fleet. Whilst they may remain immobile for most of the game don't underestimate their ability to break off and snag an objective in the last turns.
Everything else just surges forwards again.
The devourer gants attempt to drown some troubles in a bucket of dice. Unfortunately without Enfeeble or Preferred Enemy their devourers are not so hot against T6/3+ and the Wraithguard pass all 5 saves. In fact my devourer gants almost always perform awfully, but I just love them too much to drop them.
I can't have that many Wraithguard still alive so the Tyrant is forced to fire into them, the Trygon adds her weaponry as well. This proves much more successful and downs 3 wraithguard all told.
On the left Flank the combined power of the Mycetic Spore and the gants slay a Dire Avenger and a Ranger apiece.
The orange Tervigon fires hopefully at the Wraithknight but, unsurprisingly, fails to do anything.
It doesn't matter though because the Wraithknight is soon bogged down by gants. A Wraithknight only gets 4 attacks, so it's only likely to kill 3 gants per player turn. So guarantee keeping it stuck for at least one turn you only need 5 or so gants. Fortunately I have 8, which should hold it there for 2+ turns, by which point I can just sic some more on it. Tarpitting is a wonderful thing!
The gants fail to wound the Wraithknight, and a few get squished in return, but it doesn't matter.
The Ymgarls massacre the Rangers, but I do lose two due to having no grenades and foolishly not choosing the bonus Toughness because 'they're just rangers.'
The central combat, although extremely important, remains dully uninteresting. One more Jetbike is slain, as are three gants, the Wraithlord is unhurt.
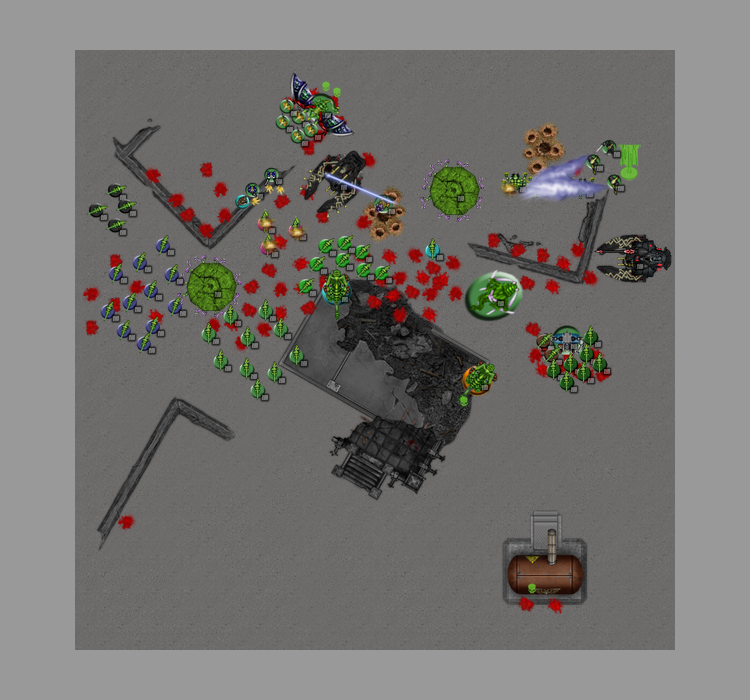
--/Turn 3 [Eldar 5 / Tyranids 2] /-------------------------------------------------------------------------
Eldar Turn 3:

This time Eldrad does cast some psychic powers, safely inside his Wave Serpent away from SitW. He grants the Fire Dragons Fortune and Guide, making that very scary squad even more formidable.
The buffed up Fire Dragons then disembark and prepare to deal with the Hive Tyrant.
The Dire Avengers also head out, hoping their weight of fire will knock the flying creature down so that the Dragons can hose it with super-heated energy.
The Relic bearing Wraithguard get back in their transport and fly backwards as far as possible (so, 6")
The Fire Prism swings round to intercept the Ymgarls before they can cause any further damage.
The Dire Avengers fail to hit the swooping Hive Tyrant.
Fortunately the Guided Fire Dragons have better luck, hitting 5 times. Only 3 of those shots wound however, and thanks to some hilariously unlikely cover saves the Tyrant loses only a single wound. It isn't even Grounded.
The Fire Prism fires a wide-beam of searing radiation at the Ymgarls, wounding 3. But once again those ever reliable 5+ cover saves result in only one lost Genestealer.
The Wave Serpents realise the threat the newly arrived devourer Gants represent (when they're not firing at Wraithguard anyway) and so hose them down with all kinds of crazy Eldar guns. Both tanks elect to Focus Fire at the gants out of cover (I suspect my opponent is beginning to lament my ability to roll cover saves by now.) This means that 6 hidden gants survive the scathing assault.
Cover saves can't save everything though and the warlord Tervigon finally falls to crack sniper fire from the remaining Rangers.
One gant manages to survive in the central combat, ensuring the last Jetbike stays where she is for another turn.
Some more bugs get squased by the Wraithknight too, but not enough to escape combat.
Tyranid Turn 3:
The Doom shows up, a tad late to the party but there are still plenty of targets.
This time the Endurance Tervigon finds herself just in range to pass that sweet, sweet FnP to the wounded Flyrant.
The Flyrant also manages to Enfeeble the Fire Dragons, worming past Eldrad's formidable psychic defense.
The blue Tervigon spawns some gants to refresh the ailing combat in the board center.
The orange Tervigon also generates some fresh gants to pit down the Wraithknight again.
The Doom smashes down near the center of the board, this lets her leech off of the Fire Dragons, Wraithlord and final Jetbike.
The Flyrant jumps over the Fire Dragons in order to ensure Eldrad is the closest model, in his Enfeebled state he is susceptible to S6 Instant Death.
The remaining 6 devourer gants head round to throw their still pretty decent firepower against the Fire Dragons.
The various spawned gant broods on the left begin converging on the Dire Avengers and Rangers, who are probably wondering where their nice clear battlefield went.
The Ymgarls hop through the ruins to catch the relic-carrying Wave Serpent.
The Trygon splits off from the main force, this serves a dual role of scaring back the Fire Prism and getting into position to hunt down the Wraithguard if necessary.
The Doom's Spirit Leech fails to unnerve the disciplined Fire Dragons, unfortunately the Wraithlord and Jetbike are not so lucky and both are slain by a hilariously poorly written rule. The Doom rises to S8.
The combined fire of the gants and Mycetic Spore on the left flank slay 3 Rangers and 2 Dire Avengers, although both squads hold firm in the face of adversity.
The devourer Gants blast into the Fire Dragons, but Fortune-ed 3+ saves are a tough nut to crack, even at T2, so only 1 is slain.
The Flyrant then takes a shot at things (well, 12 shots, but still.) This forces 8 saves. Eldrad passes 7 Look Out, Sir rolls. He then fails his first invulnerable save, and then he fails the re-roll too. Eldrad is slain instantly by Enfeeble-based shenanigans and the Tyranids score the warlord VP. 2 or 3 Fire Dragons are also slain by the worm-bullets bouncing off of Eldrad's psychic shield.
The Ymgarls make short work of the Wave Serpent, although the resultant explosion kills one of the Genestealers.
More gants are added to the combat around the Wraithknight's feet, they still don't cause any wounds but it still doesn't matter.
I use the devourer gants to draw the Fire Dragons overwatch away from the Hive Tyrant, which turns out to have been a sound plan as they fry three gaunts with their re-rolled snapshots. This means the gants don't make the combat.
The Hive Tyrant is standing like 2 feet away though and she makes it injust fine, plowing through two of the Fire Dragons. I had forgotten about Melta Bombs though, which manage to knock two wounds off the monster, although one is ignored through Feel no Pain.
--/Turn 4 [Eldar 2 / Tyranids 2] /------------------------------------------------------------------------------------
Eldar Turn 4:
The now rideless Wraithguard set themselves up for some highly incendiary vengeance against the Ymgarls.
The Dire Avengers, with no way of killing all the gants piling up around them, settle on finishing off the most expensive ones.
The last Wave Serpent flies around to stop the Doom from reaching the Fire Dragons.
The Wraithguards D-Scythes light up, poor rolling, even with the re-rolls to wound from the Spiritseer, mean only 3 of the Ymgarls are shredded apart.
Luckily the last Ranger is on the ball to settle the score, making a perfect kill-shot on the last Ymgarl from across the battle with his final bullet.
The Wave Serpent's Bright Lance attempts to obliterate the Doom but it's energies are dispersed harmlessly from the psychic monstrosities force shield.
The Fire Prism backs up, I forgot what it tried to fire at this turn but either way it did no damage.
The Dire Avengers finish off the devourer gants.
The Wraithknight continues stomping gants whose poison is apparently completely useless.
The Hive Tyrant rampages through the Fire Dragons, killing 3 including the Exarch with a Precision Strike. The Dragon's Melta Bombs but the beast down to a single wound. It is not enough however and the aspect warriors are chased down and cut apart. The Tyrant gets a vital 6" consolidation move towards the all-imporant Relic.
Tyranid Turn 4:
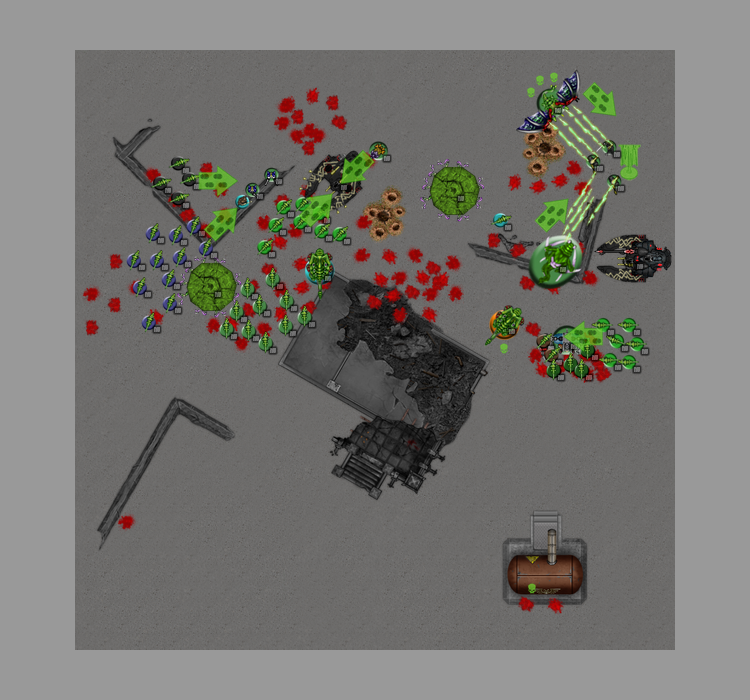
With only 1 wound remaining the Tyrant doesn't risk any psychic powers.
The Tervigons do though, each Iron Arm-ing or Enduranc-ing themselves.
They also spawn some more gants towards the last Wave Serpent and the Wraithknight.
With last turns 6" consolidation move the Flyrant is able to make a 12" move towards the Wraithguard and land within a comfortable chare range, successfully pulling this off most likely wins the game as the Tyrant can easily slay the Wraithguard in combat, and they are the last Eldar scoring units nearby.
The Trygon heads off through the ruins to head off the Wraithguard in a pincer movement.
The Doom and a gant squad move in to attack the Wave Serpent and the remaining gants press on towards the Avengers and Rangers.
The lone surviving gant from the central combat heads rightwards to grab the Relic if it falls.
The Flyrant and Tervigon open up on the Wraithguard, the Flyrant's S6 shots manage to gib the Spiritseer whilst the Trygon downs a Wraithguard. Only one remains guarding the Relic now.
The gants on the left end the resistance of the Avengers and Rangers in a hail of voracious beetle-forms.
That last remaining Wraithguard still has a D-Scythe, so D3 overwatch hits. And a single 6 spells the end for my Tyrant. So, the Trygon attempts to charge first. This is a long charge through terrain; 10". But the Trygon of course has fleet. My opponent elects not to overwatch in the hopes the Trygon fails (quite likely) leaving him free to roast the Hive Tyrant.
The Trygon rolls a 4,5,6. Just 1" short.
Fleet lets me re-roll the 4, a 1-in-3 chance of success now.
The dice shows up a 5; 10 inches exactly!
The Trygon slams into combat, the Wraithguard's deadly overwatch wasted.
At this point my opponent concedes; a single Wraithguard is no match for one MC, let alone two.
The Relic had fallen out of Eldar hands.
Of course this doesn't necessarily mean it falls into Tyranid hands; you can only claim the Relic in the movement phase, any my nearest scoring unit was 12" away. If the game ended after 5 turns the Tyranids couldn't make it and the game would end a draw.
The dice was passed to an innocent bystander and once again fortune favoured the Tyranids with the game continuing into a 6th turn, providing ample time for the Relic to be seized.
--//------------------------------------------------------------------------------------------
So, that's that.
The game ended with a Tyranid win 5-2 (Relic, Warlord, Linebreaker versus First Blood and Warlord.)
I had a lot of good luck in that game, plenty of lucky saves and, perhaps more importantly, an ample stream of gants. So long as you can keep the Eldar units locked down you stand a decent chance at forcing them into difficult choices.
Unless they're running 6 Wave Serpents, in which case good luck!
Thanks for reading, do feel free to note rule or tactical errors as usual.
I'm back with a new Battle Report, this time showcasing the new(-ish) Eldar codex.
The game is 1850pts over a 4'x4' table. Not quite as much terrain coverage as you might like but such is life.
The mission is The Relic and the deployment your standard 12" board edge lanes for ease.
I haven't had much opportunity to play versus Eldar since their update, and my list is more geared towards dealing with Tau gunlines than anything, so the outcome is far from certain...
--/Lists/----------------------------------------------------------------------------------
Eldar
•HQ:
-Eldrad Ulthran
-Spiritseer
•Troops:
-5x Dire Avengers (Exarch)
-5x Rangers
-5x Rangers
-3x Windrider Jetbikes
-5x Wraithguard (D-Scythes)
~Wave Serpent (Bright Lance, Holofields, Spirit Stones)
•Elites:
-10x Fire Dragons (Exarch)
~Wave Serpent (Scatter Laser, Holofields, Spirit Stones)
•Heavy Support:
-Wraithlord (Bright Lance, Flamers, Wraithsword)
-Wraithknight (Suncannon, Scatter Laser, Shield)
-Fire Prism
Although not exactly one of them spam lists you see wiping tables this is by no means a bad Eldar list. No real poor unit choices in there. I'm not entirely sure what the 5 man Avenger squad is there for, maybe just as a mobile troops choice? To my mind a second Jetbike squad would serve better. Still, Wave Serpents are trouble even if there are only two of them. The Fire Dragons and Wraithguard are more than capable of making a real mess of any MC they come across.
Eldrad joins the Fire Dragons and rolls in the Runes of Fate psychic table, gaining Fortune, Guide, Misfortune and Doom.
The Spiritseer puts her lot in with the Wraithguard and rolls on Runes of Battle to get Destructor/Renewer and, uhh, the one which effects Run moves. (I don't know the codex psychic tables very well...)
Tyranids
•HQ:
-Tervigon (3 powers, Toxin Sacs, Adrenal Glands)
-Hive Tyrant (2x Devourers, Hive Commander, Wings)
•Troops:
-Tervigon (3 powers, Toxin Sacs, Adrenal Glands)
-Tervigon (2 powers, Toxin Sacs, Adrenal Glands)
-10x Termagants
-20x Termagants (Devourers)
~Mycetic Spore
•Elites:
-8x Ymgarl Genestealers
-Doom of Malan'tai
~Mycetic Spore
•Heavy Support:
-2x Biovores
-Trygon Prime
Strictly speaking this list is designed around countering Tau gunlines, hence the emphasis on heavy support elements entering play from reserves. Fortunately it is also quite flexible; although you could reserve all sorts of units you only have to reserve 3 (The Spore Pods and the Ymgarls) so depending on table set up and army composition I'm free to slice the reserves however works best. In this case only the necessities go in reserves; the Eldar list is relying on quite a lot of small units and I'm going to need strong table presence to deal with that from the get-go.
Most of the Tyranid psykers roll on the Biomancy table, but none of them roll well. I think every single one of them rolled Haemorrage at least once and ultimately they all end up with just one 'good' power each. The Warlord Tervigon has Warp Speed, the Flyrant Enfeeble, the 3 power scoring Tervigon Iron Arm and the last Tervigon Endurance.
The Doom attempts to roll Puppet Master from Telepathy because I think it's fun but fails, and so takes Psychic Shriek instead, so she can deal with Rangers or fortuned units without invulnerable saves.
--/Deployment/-----------------------------------------------------------------------------------------

The Eldar win the roll to go first and set up as shown. I'm using a Dreadknight to represent the Wraithknight 'cos I don't have a Wraithknight sprite vailable.
The Jetbikes set up centrally to grab the relic as quickly as possible.
Eldrad is the Eldar warlord, and he comes with his own Warlord trait so no rolling there.
The Rangers infiltrate a few inches forwards to take advantage of some ruined parapets.
There is not as much terrain on the Tyranid table half; the Biovores are forced to hunker behind a barely adequate bunker structure.
The gants I leave out in the open in the vague hope of tempting my opponent to waste some firepower on them instead of on my valuable units.
The green Tervigon is the Warlord, which conveniently forces the first turn into Night Fighting, which might save a few wounds.
The blue Tervigon has Iron Arm and the orange Endurance.
The Flyrant hides mostly out of LoS for now in because I need her alive for the reserves bonus.
--/Turn 1 [Eldar 3 / Tyranids 0] /---------------------------------------------------------------------------
Eldar Turn 1:

No Psychic powers are cast this turn; Eldrad's tank can already twin-link itself reliably enough and there's not much point Fortune-ing the Fire Dragons due to the Tyranids poor anti-tank weaponry.
The Jetbikes zip forwards into the central ruins to claim the Relic.
Everything else slips around to get better firing lines.
The shooting phase begins with the Wraithknight and Rangers killing one Biovore and wounding another, both units able to just spy the squat bioforms from their elevated vantage points.
The Fire Prism lances it's weaponry into the orange Tervigon, but is foxed by the dim light and protruding ruins.
Both Wave Serpents light up the dawn with their advanced alien firepower, flinging arcs of exotic energy into the warlord Tervigon. The lumbering beast suffers two wounds under the onslaught. The nearby Rangers neatly knock off a further wound.
The jetbikes roll a 10" assault jump move, but may only move 6" whilst holding the cumbersome Relic.
Tyranid Turn 1:

Endurance is cast on the warlord Tervigon, in the vain hope of protecting her from another volley of fire before I lose a VP.
The blue Tervigon Iron Arms up to T8.
The warlord Tervigon 10 gants up the left flank, seen as it's unlikely she'll last another turn.
The orange Tervigon disgorges 12 gants into the central ruins, slowed by the Relic, and lacking Hit and Run, the Eldar Jetbikes are unable to escape the nimble crowd of fanged horrors picking their way deftly through the rubble.
The movement phase has everything bar the Biovore surge forwards. It's vital that the Eldar are not allowed to control the board, one way of preventing this is to force them into their own deployment half. Most of their guns lack Rapid Fire so you don't suffer further damage and if you catch most Eldar squads with gants you can either kill them or stop them from doing too much for a while.
The Biovore attempts to achieve something by firing at the exposed Rangers, buuut obviously misses horribly. So horribly in fact that I get to place a Spore Mine! I have never gotten to do that before! I am unduly excited about it.
The spawned gants fire at the Jetbikes, but fortunately fail to kill them, I shouldn't have shot at them in the first place to be honest as I definantly don't want them fleeing.
The Flyrant takes some wistful shots at a Wave Serpent, but it's foiled by it's silly Eldar cover save.
The gants then charge into the Jetbikes, they lose some to Overwatch, and some more to combat wounds, but they succeed in killing one, and, more importantly, hold the Jetbikes there for at least one turn.
--/Turn 2 [Eldar 4 / Tyranids 0] /----------------------------------------------------------------------------------
Eldar Turn 2:

The Wraithlord stalks out of cover to assist the beleaguered jetbikes.
Meanwhile, much to my dismay, the Wraithknight jets next to the Spore Mine. The autonomous bombs lethal detonation splashes harmlessly off the constructs shins.
The Jetbikes drop the Relic, allowing it to be moved 1". This is followed by the Wraithguard disembarking from their transport and scooping up the fallen Relic. On the one hand this secures the relic, on the other it means the Wraithguard are now exposed and Wave Serpent-less.
The second Wraith Serpent sidles up to get LoS on the hiding Tyranid warlord.
The Wraithknight fells the remaining Biovore, scoring the Eldar the First Blood VP in the process.
Both Wave Serpents once again unleash their firepower into the Tyranid warlord. The hammering blows leave the Tervigon with just a single wound remaining. The left hand Rangers attempt to finish her off but cannot deal a mortal strike through the ruins and the beast unnatural Endurance.
The second Ranger squad cannot draw LoS to the warlord and so content themselves with firing into the orange Tervigon along with the Fire Prism, this proves an easier task now that dawn's light has truly risen and the Tervigon loses a wound.
The Dire Avengers exercise well practices combat drills and mow down ranks of gants, slaying six of the freshly spawned creatures.
The Wraithlord charges into save the Jetbikes. Outside of a Tervigons toxic aura the gants are unable to scratch the Wraith's gleaming structure and so attempt to drag down another Jetbike, but are unable to do that either. Fortunately the combined Eldar assault doesn't fare much better and only 2 gants are slain, both by the Wraithlord.
Tyranid Turn 2:

Rolling for reserves sees the devourer Gants and Ymgarls show up. Could have done with the Doom to help deal with those Wraithguard, but you can't have everything.
Once again Endurance is cast on the wounded Tervigon, hoping to stave off her death another turn.
The Flyrant attempts to Enfeeble the Wraithguard but fails to cast.
The Ymgarls had secreted themselves in the central ruins, I had hoped the relic might have stayed in there a little longer, but no matter, all the fighting has roused the Genestealers and they're hungry for violence.
The warlord spawns ten more gants, I suspect these will be the last lot she'll be spawning this game.
Although I am quite annoyed that my free Spore Mine didn't get to do anything in destroying it the Wraithknight has wandered a little too close to the orange Tervigon, who happily flings a bunch of gants in it's direction.
Unfortunately that does mean I've run out of spare gants so I probably won't be able to keep the Jetbikes locked down much longer.
The devourer Gants land to threaten the Wraithguard and also close of a whole swathe of the battlefield, the Flyrant swoops across the board, now in a prime position to either assist with taking down Wraithguard or shooting out the back armour of a Wave Serpent.
The warlord limps backwards, sensing her imminent demise she tries to keep her death throes from damaging the nearby gants.
The Ymgarls break cover to hunt down some Rangers, as well as being a threat to the many MCs on the board these units are scoring and, like most Eldar, fleet. Whilst they may remain immobile for most of the game don't underestimate their ability to break off and snag an objective in the last turns.
Everything else just surges forwards again.
The devourer gants attempt to drown some troubles in a bucket of dice. Unfortunately without Enfeeble or Preferred Enemy their devourers are not so hot against T6/3+ and the Wraithguard pass all 5 saves. In fact my devourer gants almost always perform awfully, but I just love them too much to drop them.
I can't have that many Wraithguard still alive so the Tyrant is forced to fire into them, the Trygon adds her weaponry as well. This proves much more successful and downs 3 wraithguard all told.
On the left Flank the combined power of the Mycetic Spore and the gants slay a Dire Avenger and a Ranger apiece.
The orange Tervigon fires hopefully at the Wraithknight but, unsurprisingly, fails to do anything.
It doesn't matter though because the Wraithknight is soon bogged down by gants. A Wraithknight only gets 4 attacks, so it's only likely to kill 3 gants per player turn. So guarantee keeping it stuck for at least one turn you only need 5 or so gants. Fortunately I have 8, which should hold it there for 2+ turns, by which point I can just sic some more on it. Tarpitting is a wonderful thing!
The gants fail to wound the Wraithknight, and a few get squished in return, but it doesn't matter.
The Ymgarls massacre the Rangers, but I do lose two due to having no grenades and foolishly not choosing the bonus Toughness because 'they're just rangers.'
The central combat, although extremely important, remains dully uninteresting. One more Jetbike is slain, as are three gants, the Wraithlord is unhurt.
--/Turn 3 [Eldar 5 / Tyranids 2] /-------------------------------------------------------------------------
Eldar Turn 3:

This time Eldrad does cast some psychic powers, safely inside his Wave Serpent away from SitW. He grants the Fire Dragons Fortune and Guide, making that very scary squad even more formidable.
The buffed up Fire Dragons then disembark and prepare to deal with the Hive Tyrant.
The Dire Avengers also head out, hoping their weight of fire will knock the flying creature down so that the Dragons can hose it with super-heated energy.
The Relic bearing Wraithguard get back in their transport and fly backwards as far as possible (so, 6")
The Fire Prism swings round to intercept the Ymgarls before they can cause any further damage.
The Dire Avengers fail to hit the swooping Hive Tyrant.
Fortunately the Guided Fire Dragons have better luck, hitting 5 times. Only 3 of those shots wound however, and thanks to some hilariously unlikely cover saves the Tyrant loses only a single wound. It isn't even Grounded.
The Fire Prism fires a wide-beam of searing radiation at the Ymgarls, wounding 3. But once again those ever reliable 5+ cover saves result in only one lost Genestealer.
The Wave Serpents realise the threat the newly arrived devourer Gants represent (when they're not firing at Wraithguard anyway) and so hose them down with all kinds of crazy Eldar guns. Both tanks elect to Focus Fire at the gants out of cover (I suspect my opponent is beginning to lament my ability to roll cover saves by now.) This means that 6 hidden gants survive the scathing assault.
Cover saves can't save everything though and the warlord Tervigon finally falls to crack sniper fire from the remaining Rangers.
One gant manages to survive in the central combat, ensuring the last Jetbike stays where she is for another turn.
Some more bugs get squased by the Wraithknight too, but not enough to escape combat.
Tyranid Turn 3:

The Doom shows up, a tad late to the party but there are still plenty of targets.
This time the Endurance Tervigon finds herself just in range to pass that sweet, sweet FnP to the wounded Flyrant.
The Flyrant also manages to Enfeeble the Fire Dragons, worming past Eldrad's formidable psychic defense.
The blue Tervigon spawns some gants to refresh the ailing combat in the board center.
The orange Tervigon also generates some fresh gants to pit down the Wraithknight again.
The Doom smashes down near the center of the board, this lets her leech off of the Fire Dragons, Wraithlord and final Jetbike.
The Flyrant jumps over the Fire Dragons in order to ensure Eldrad is the closest model, in his Enfeebled state he is susceptible to S6 Instant Death.
The remaining 6 devourer gants head round to throw their still pretty decent firepower against the Fire Dragons.
The various spawned gant broods on the left begin converging on the Dire Avengers and Rangers, who are probably wondering where their nice clear battlefield went.
The Ymgarls hop through the ruins to catch the relic-carrying Wave Serpent.
The Trygon splits off from the main force, this serves a dual role of scaring back the Fire Prism and getting into position to hunt down the Wraithguard if necessary.
The Doom's Spirit Leech fails to unnerve the disciplined Fire Dragons, unfortunately the Wraithlord and Jetbike are not so lucky and both are slain by a hilariously poorly written rule. The Doom rises to S8.
The combined fire of the gants and Mycetic Spore on the left flank slay 3 Rangers and 2 Dire Avengers, although both squads hold firm in the face of adversity.
The devourer Gants blast into the Fire Dragons, but Fortune-ed 3+ saves are a tough nut to crack, even at T2, so only 1 is slain.
The Flyrant then takes a shot at things (well, 12 shots, but still.) This forces 8 saves. Eldrad passes 7 Look Out, Sir rolls. He then fails his first invulnerable save, and then he fails the re-roll too. Eldrad is slain instantly by Enfeeble-based shenanigans and the Tyranids score the warlord VP. 2 or 3 Fire Dragons are also slain by the worm-bullets bouncing off of Eldrad's psychic shield.
The Ymgarls make short work of the Wave Serpent, although the resultant explosion kills one of the Genestealers.
More gants are added to the combat around the Wraithknight's feet, they still don't cause any wounds but it still doesn't matter.
I use the devourer gants to draw the Fire Dragons overwatch away from the Hive Tyrant, which turns out to have been a sound plan as they fry three gaunts with their re-rolled snapshots. This means the gants don't make the combat.
The Hive Tyrant is standing like 2 feet away though and she makes it injust fine, plowing through two of the Fire Dragons. I had forgotten about Melta Bombs though, which manage to knock two wounds off the monster, although one is ignored through Feel no Pain.
--/Turn 4 [Eldar 2 / Tyranids 2] /------------------------------------------------------------------------------------
Eldar Turn 4:

The now rideless Wraithguard set themselves up for some highly incendiary vengeance against the Ymgarls.
The Dire Avengers, with no way of killing all the gants piling up around them, settle on finishing off the most expensive ones.
The last Wave Serpent flies around to stop the Doom from reaching the Fire Dragons.
The Wraithguards D-Scythes light up, poor rolling, even with the re-rolls to wound from the Spiritseer, mean only 3 of the Ymgarls are shredded apart.
Luckily the last Ranger is on the ball to settle the score, making a perfect kill-shot on the last Ymgarl from across the battle with his final bullet.
The Wave Serpent's Bright Lance attempts to obliterate the Doom but it's energies are dispersed harmlessly from the psychic monstrosities force shield.
The Fire Prism backs up, I forgot what it tried to fire at this turn but either way it did no damage.
The Dire Avengers finish off the devourer gants.
The Wraithknight continues stomping gants whose poison is apparently completely useless.
The Hive Tyrant rampages through the Fire Dragons, killing 3 including the Exarch with a Precision Strike. The Dragon's Melta Bombs but the beast down to a single wound. It is not enough however and the aspect warriors are chased down and cut apart. The Tyrant gets a vital 6" consolidation move towards the all-imporant Relic.
Tyranid Turn 4:

With only 1 wound remaining the Tyrant doesn't risk any psychic powers.
The Tervigons do though, each Iron Arm-ing or Enduranc-ing themselves.
They also spawn some more gants towards the last Wave Serpent and the Wraithknight.
With last turns 6" consolidation move the Flyrant is able to make a 12" move towards the Wraithguard and land within a comfortable chare range, successfully pulling this off most likely wins the game as the Tyrant can easily slay the Wraithguard in combat, and they are the last Eldar scoring units nearby.
The Trygon heads off through the ruins to head off the Wraithguard in a pincer movement.
The Doom and a gant squad move in to attack the Wave Serpent and the remaining gants press on towards the Avengers and Rangers.
The lone surviving gant from the central combat heads rightwards to grab the Relic if it falls.
The Flyrant and Tervigon open up on the Wraithguard, the Flyrant's S6 shots manage to gib the Spiritseer whilst the Trygon downs a Wraithguard. Only one remains guarding the Relic now.
The gants on the left end the resistance of the Avengers and Rangers in a hail of voracious beetle-forms.
That last remaining Wraithguard still has a D-Scythe, so D3 overwatch hits. And a single 6 spells the end for my Tyrant. So, the Trygon attempts to charge first. This is a long charge through terrain; 10". But the Trygon of course has fleet. My opponent elects not to overwatch in the hopes the Trygon fails (quite likely) leaving him free to roast the Hive Tyrant.
The Trygon rolls a 4,5,6. Just 1" short.
Fleet lets me re-roll the 4, a 1-in-3 chance of success now.
The dice shows up a 5; 10 inches exactly!
The Trygon slams into combat, the Wraithguard's deadly overwatch wasted.
At this point my opponent concedes; a single Wraithguard is no match for one MC, let alone two.
The Relic had fallen out of Eldar hands.
Of course this doesn't necessarily mean it falls into Tyranid hands; you can only claim the Relic in the movement phase, any my nearest scoring unit was 12" away. If the game ended after 5 turns the Tyranids couldn't make it and the game would end a draw.
The dice was passed to an innocent bystander and once again fortune favoured the Tyranids with the game continuing into a 6th turn, providing ample time for the Relic to be seized.
--//------------------------------------------------------------------------------------------
So, that's that.
The game ended with a Tyranid win 5-2 (Relic, Warlord, Linebreaker versus First Blood and Warlord.)
I had a lot of good luck in that game, plenty of lucky saves and, perhaps more importantly, an ample stream of gants. So long as you can keep the Eldar units locked down you stand a decent chance at forcing them into difficult choices.
Unless they're running 6 Wave Serpents, in which case good luck!
Thanks for reading, do feel free to note rule or tactical errors as usual.


 "
"


