Post by hive fleet pandora on Apr 28, 2012 0:18:01 GMT

So here we are. Before I continue, heres some useful links:
Citatel paint coversion chart: www.games-workshop.com/MEDIA_CustomProductCatalog/m2320032a_Citadel_Conversion_Chart A useful chart that helps you match old colors with new.
Citatel painting guides: www.games-workshop.com/gws/catalog/paintChart.jsp?catId=cat820002a&rootCatGameStyle= has colors that you need to paint certain tones, in a step by step format.
Introduction
Throughout this guide I will be taking you through a step-by-step method of painting Tyranids with the new paints, using my color scheme (Hive Fleet Pandora) and my Tyrant Guard with lashwhip. Also, there is a method to my madness, you may think im jumping around while reading the guide, but that is done purposefully, to save time by taking advantage of drying times. If your waiting for a carapace wash to dry, why not paint the skin? Or the base?
First thing is to spray undercoat the model skull white, I use white because my scheme is bright.
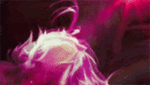
Before I go onto painting, I want to put a word in about Liquid green stuff. Its great. It comes in a pot like regular paints, is quite thick, you can apply it with a regular brush, and its great for gap filling. You can see below how ive used it to fill in a gap between the Tyrant guards lashwhip and the rest of his arm:

Exoskeleton part 1
Now moving onto the actual painting. First thing to do is basecoat the exoskeleton with Averland Sunset, which is obviously one of the new base paints. these are quite good as they have more "pop" than the old foundation paints. Don't worry about this first layer too much, so if you leave a small part showing white, don't worry this will be fixed with a shade.

Speaking of shades, these are the same as the old washes, and a good to get depth in a model. Wash the exoskeleton with Agrax earthshade. Apply this very thoroughly and slowly, if you apply it too fast the wash will bubble and you will have to sit there blowing on your tyrant guard. By now your Tyrant guard should look like this: you can see that the liquid green stuff gap fill is now indistinguishable.

Carapace
While that is drying you can move onto the carapace. Start by coating all carapace and claw bits with abaddon black.

Next comes the famous blue color. You will be coating the carapace with watered down colour paints. Do it like this: dip your brush in water, then dip it into the paint, and apply a small line along the edge of the carapace. Working quickly, grab another brush and stroke the color inwards away from the edge of the carapace.
First do this with kantor blue, as this is a base paint you will need to water it down slightly more because it is thicker than the other paints. You should get something like this:

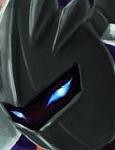
Do that on the whole model. And then repeat with Hoeth blue and then again with Lothern blue (these are layer paints so dont water them down as much as the Kantor blue.) Your carapace will now look like this:

The next part is a glaze, my favourite out of the new paint range. Apply these the same as a wash. Instead of going to the recesses this will stick to flat surface and enrichen colors. Glaze the carapace with Gulliman blue.

A note on Glazes: there is only 4 (yellow, red, green and blue) so you wont always be able to find a use for these, but in this case it works, and works well.
Base part 1
While the glaze is drying you can move onto the first part of the base. Coat the base with a layer of Astrogranite. This is one of the new texture paints. A note on texture paints: the thicker you put it on, the better it looks but you use more paint and have to wait longer for it to dry (sometimes overnight) I prefer thick so here we are:

Finishing the exoskeleton
Next, layer the exoskeleton with Zamesi desert. To layer, coat the upper parts of the model but leave the deep recesses showing. The new layer paints don't need to be thinned.

Then layer with Ushabti bone.

Final touches and base
Almost done! Now drybrush the entire model with praxeti white, and pick out details such as teeth and tongues. Tounges are first coated with Caliban green and then with Moot green, you can then glaze the tounges and other green details with Waywatcher green.

The base is shaded with Nuln oil and then drybrushed with Longbeard grey. Then edged with Abaddon black.

you can now apply flock or anything else you may want on the base.
Conclusion
And your done! I hope everyone enjoyed this guide and they learned something new. I would just like to say that this is not a guide on how to paint my color scheme (although im sure someone will steal it
 ) but a guide on paiting nids with the new paints. The techniques I explained here can be used with different colors, for example, if you wanted a green carapace, replace the blues with greens and the white dry with a green dry. I also suggest you use the two links I have at the start of this guide, and also the painting guides in this months white dwarf, and next months white dwarf, things like that always come in handy. Now that I finished my Tyrant guard I can continue my stealers and start on my swarmlord. You will be seeing blue and white nids around here alot more (maybe even in a paint comp). And who knows, if necrons sucker me in you'll be seeing them too.
 And with that note, I leave you with the finished product!