Post by Xenos on Feb 8, 2012 13:02:40 GMT
Mycetic Spores are a powerful addition to the Tyranid arsenal and a must-have upgrade for many of our units. This is a quick tutorial for making some decent looking Spores with some cool effects.

First off, buy some 'Mega Bloks Plasma Hatchers'. They are cheap and available in many online stores.

We will only be using the bottom half of the egg for these Spores. You can actually use the top half to make a 2nd spore, or paint it into some cool looking terrain.

This is actually the hardest part of the whole process - cut the thick cylindrical protrusion out to make a hole in the bottom. It's very thick so you might need some larger tools.

Next we make the base. You will need a 60mm base, an LED and a battery holder.
The LEDs are very cheap and come in many colours. I bought some 5mm red ones but go with whatever colour scheme you want (green would be another good choice). I got mine from here:
www.microminiatures.co.uk/acatalog/Standard_5mm_LED_s.html
The batteries you want are CR2032 3V Lithium Batteries. These do not require resistors for the LEDs we are using. Then get some 3V battery holders like these:
www.rapidbatteries.com/CR2025-CR2032-PCB-Battery-holder.html
The great thing about these is that you can pop the batteries in and out so we don't need a switch.


When your gear arrives be sure to test it. Put the battery in the holder and bend the LED prongs out so that they can touch the power leads. If the LED lights up, all is well! Be sure to test absolutely everything, as there is no going back after the following steps.

With everything working, use some masking tape to fix the LED to the battery holder.

Then cut a hole in the base that will just fit the battery holder. Don't worry if it's not super precise.

Fit the battery holder & LED into the base and super-glue it in place.

You can see the battery is accessible from underneath the base. This is important as it's our only way of turning the thing on and off.

I duct-taped the whole thing down but this isn't necessary, I just like being cautious.

Then glue the egg onto the base...

And use some putty to seal the bottom. This IS necessary. Be careful not to get any in the battery holder.


Do the same on the other side. The most important thing to do is cover the base with putty (I used Milliput) to make it look seamless, being careful not to cover the LED completely. Also, add tentacles to make the inside more interesting.


Then... flourish! This is where I tacked on some sharks teeth - these are great accessories for Tyranid conversions and are also very cheap. I got mine from here and I highly recommend them:
www.ukge.co.uk/uk/product.asp?numRecordPosition=2&P_ID=3636&strPageHistory=&strKeywords=&SearchFor=&PT_ID=363
What the pictures don't show is that I covered the LED with a small hood. This was because the LED was too bright and I wanted to diffuse it. You can buy diffused LEDs or try to sand-paper normal ones, however I found a little hood did the job just fine.

When you are happy with your modelling then base-coat the whole thing (cover the LED with some tape) and paint.

I used Bleached Bone on the outside and Blood Red on the inside to have a nice contrast, but the only important thing to do is matching the inside colour to the LED's colour.

Complete the job by painting it up properly and adding stuff to the base. I chopped a Termagant in half and glued him to the bottom. You can see the LED hood in this picture, it faces the Termagant to light up his face. I also covered the whole thing in Army Painter Quickshade:
shop.thearmypainter.com/products.php?ProductGroupId=1
This makes it more expensive but I cover all my Tyranids in it so it's not too bad. I used the Dark Shade.


Almost there. You now have 3 options - leave it as is, coat the base in Water Effects, or fill it with Epoxy Resin.
The problem with Water Effects is that you can only get 1-2mm worth of depth. It's cheaper and looks good, but you really want to go down the Epoxy Resin route for the full effect. I got mine from here:
www.rutlands.co.uk/finishes-glues-&-materials/epoxy-resin-systems/epoxy-resin/WS206A/resin-and-hardener-pack---slow-cure---1.2kg
You don't need that much if you're only doing 1-2 Spores (they sell a mini-pack) but I like to have some handy. BE VERY CAREFUL with this, they use it to seal boats so it's very, very strong, very toxic and dries extremely quickly. Don't use it indoors, always wear protective clothing and dispose of excess responsibly.
To use the resin you mix the 2 components and stir gently - if you agitate the mixture you'll create small bubbles, which can actually be a nice effect, but only do it if that's what you want. I added a TINY drop of blood red to the mixture just to tint it, but be careful because if you add too much you'll lose the opacity.
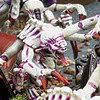
And that's it. Here are some more photos of the finished Spores, if I've left anything out feel free to ask questions.


Happy hunting!
First off, buy some 'Mega Bloks Plasma Hatchers'. They are cheap and available in many online stores.
We will only be using the bottom half of the egg for these Spores. You can actually use the top half to make a 2nd spore, or paint it into some cool looking terrain.
This is actually the hardest part of the whole process - cut the thick cylindrical protrusion out to make a hole in the bottom. It's very thick so you might need some larger tools.
Next we make the base. You will need a 60mm base, an LED and a battery holder.
The LEDs are very cheap and come in many colours. I bought some 5mm red ones but go with whatever colour scheme you want (green would be another good choice). I got mine from here:
www.microminiatures.co.uk/acatalog/Standard_5mm_LED_s.html
The batteries you want are CR2032 3V Lithium Batteries. These do not require resistors for the LEDs we are using. Then get some 3V battery holders like these:
www.rapidbatteries.com/CR2025-CR2032-PCB-Battery-holder.html
The great thing about these is that you can pop the batteries in and out so we don't need a switch.
When your gear arrives be sure to test it. Put the battery in the holder and bend the LED prongs out so that they can touch the power leads. If the LED lights up, all is well! Be sure to test absolutely everything, as there is no going back after the following steps.
With everything working, use some masking tape to fix the LED to the battery holder.
Then cut a hole in the base that will just fit the battery holder. Don't worry if it's not super precise.
Fit the battery holder & LED into the base and super-glue it in place.
You can see the battery is accessible from underneath the base. This is important as it's our only way of turning the thing on and off.
I duct-taped the whole thing down but this isn't necessary, I just like being cautious.
Then glue the egg onto the base...
And use some putty to seal the bottom. This IS necessary. Be careful not to get any in the battery holder.
Do the same on the other side. The most important thing to do is cover the base with putty (I used Milliput) to make it look seamless, being careful not to cover the LED completely. Also, add tentacles to make the inside more interesting.
Then... flourish! This is where I tacked on some sharks teeth - these are great accessories for Tyranid conversions and are also very cheap. I got mine from here and I highly recommend them:
www.ukge.co.uk/uk/product.asp?numRecordPosition=2&P_ID=3636&strPageHistory=&strKeywords=&SearchFor=&PT_ID=363
What the pictures don't show is that I covered the LED with a small hood. This was because the LED was too bright and I wanted to diffuse it. You can buy diffused LEDs or try to sand-paper normal ones, however I found a little hood did the job just fine.
When you are happy with your modelling then base-coat the whole thing (cover the LED with some tape) and paint.
I used Bleached Bone on the outside and Blood Red on the inside to have a nice contrast, but the only important thing to do is matching the inside colour to the LED's colour.
Complete the job by painting it up properly and adding stuff to the base. I chopped a Termagant in half and glued him to the bottom. You can see the LED hood in this picture, it faces the Termagant to light up his face. I also covered the whole thing in Army Painter Quickshade:
shop.thearmypainter.com/products.php?ProductGroupId=1
This makes it more expensive but I cover all my Tyranids in it so it's not too bad. I used the Dark Shade.
Almost there. You now have 3 options - leave it as is, coat the base in Water Effects, or fill it with Epoxy Resin.
The problem with Water Effects is that you can only get 1-2mm worth of depth. It's cheaper and looks good, but you really want to go down the Epoxy Resin route for the full effect. I got mine from here:
www.rutlands.co.uk/finishes-glues-&-materials/epoxy-resin-systems/epoxy-resin/WS206A/resin-and-hardener-pack---slow-cure---1.2kg
You don't need that much if you're only doing 1-2 Spores (they sell a mini-pack) but I like to have some handy. BE VERY CAREFUL with this, they use it to seal boats so it's very, very strong, very toxic and dries extremely quickly. Don't use it indoors, always wear protective clothing and dispose of excess responsibly.
To use the resin you mix the 2 components and stir gently - if you agitate the mixture you'll create small bubbles, which can actually be a nice effect, but only do it if that's what you want. I added a TINY drop of blood red to the mixture just to tint it, but be careful because if you add too much you'll lose the opacity.
And that's it. Here are some more photos of the finished Spores, if I've left anything out feel free to ask questions.
Happy hunting!

 LEDs are a really nifty addition. What was your inspiration for this?